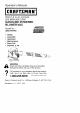
Operator's Manual JCRAFTSMAN°I 25cc/1.5 cu.in. 2-Cycle 200 MPH/430 CFM GASOLINE POWERED BLOWERNAC Model No. 358.794740 • Safety • Assembly • • Operation Maintenance • Parts List • Espar_ol, p. 20 WARNING: Read and follow all Safety Rules and Operating Instructions before first use of this product. For answers to your questions about this product: Call 7 am-7 pm, Mon.-Sat., or 10 am-7 pm, Sun. 1-800-235-5878 Sears, Roebuck 545146930 Rev. 3 and Co.
Warranty Statement 2 Identification ofSafety Symbols2 Safety Rules 3 Assembly 6 Operation 9 Maintenance 11 Storage 14 Troubleshooting Table 15 Emissions Statement 16 Parts List 18 Spanish 21 Parts andOrdering Back Cover TWO YEAR FULL WARRANTY ON CRAFTSMAN@ GAS BLOWER When used and maintained according to the operator's manual, if this product fails due to a defect in material or workmanship within two (2) years from the date of purchase, return it to any Sears store, Sears Service Center, or other Craftsm
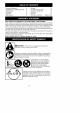
Do not wear jewelry, loose clothing, or clothing with loosing hanging straps, ties, tassels, etc. They can be caught in moving parts. _ O "_ I Always stop unit and disconnect before cleaning or servicing. spark plug I @@1 _, WARNING: Stop the engine before opening the vacuum inlet door. The engine must be stopped and the impeller blades no longer turning to avoid serious injury from the rotating blades.
• Move slowly back and forth over the material as you vacuum. Avoid forcing the unit into a pile of debris as this can clog the unit. • Keep the vacuum tube about an inch above the ground for best results. PLAN AHEAD • Always wear eye protection when operating, servicing, or performing maintenance on unit. Wearing eye protection will help to prevent rocks or debris from being blown or ricocheting into eyes and face which can result in blindness and/or serious injury. Eye protection should be marked Z87.
which can accumulate and restrict proper air flow. • Never place any object in air intake opening as this could restrict proper air flow and cause damage to the unit. • Never use for spreading chemicals, fertilizers, or other substances which may contain toxic materials. • To avoid spreading fire, do not use near leaf or brush fires, fireplaces, barbecue pits, ashtrays, etc. • Use only for jobs explained in this manual.
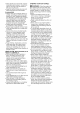
CARTON CONTENTS Check carton contents against the following list. Model 358.794740 • Blower • • • • Upper blower tube Lower blower tube High velocity nozzle Elbow tube 4. Align the rib on the upper blower tube with the groove in the blower outlet; slide the tube into place. NOTE: Knob must be loose enough to allow blower tubes to be inserted in • Vacuum bag • Upper vacuum tube • Lower vacuum tube • 2-Cycle engine oil NOTE: It is normal for the fuel filter to rattle in the empty fuel tank.
3. Rib Hold the vacuum inlet cover open until upper vacuum tube is installed. Vacuum inlet Cover Zipper Opening Small Opening NOTE: Make sure edge of the small opening is flush against the flared area of the elbow tube, and the rib on the elbow tube is on the bottom. 3. 4. Close the zipper on the bag. Make sure the zipper is closed completely. Remove blower tubes from engine. Vacuum 4. Groove Inlet Align the tabs on the inside of the vacuum inlet with the slots in the upper vacuum tube.
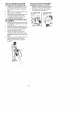
HOW TO CONVERT UNIT FROM VACUUM USE TO BLOWER USE 1. Remove the elbow tube and vacuum bag by turning the knob counterclockwise to loosen the elbow tube. SHOULDER STRAP ATTACHMENT (optional accessory #71-85783) 1. Pass the shoulder strap over your head and onto your left shoulder. 2. Snap the hook onto the retainer (see following illustration). 2. Remove the vacuum tubes by turning the tubes clockwise. 3. Close the vacuum inlet cover and make sure it is latched closed. 4.
KNOW YOUR BLOWER READ THIS iNSTRUCTiON MANUAL AND SAFETY RULES BEFORE OPERATING YOUR UNIT. Compare the illustrations with your unit to familiarize yourself with the location of the various controls and adjustments. Save this manual for future reference.
IMPORTANT Experience indicates that alcohol blended fuels (called gasohol or using ethanol or methanol) can attract moisture which leads to separation and formation of acids during storage. Acidic gas can damage the fuel system of an engine while in storage. To avoid engine problems, empty the fuel system before storage for 30 days or longer. Drain the gas tank, start the engine and let it run until the fuel lines and carburetor are empty. Use fresh fuel next season.
up by the air intake and thrown out through the discharge opening, damaging the unit or property, or causing serious injury to bystanders or the operator. STARTING A COLD ENGINE 1. Slowly press the primer bulb 6 times. 2. Move choke lever to the FULL CHOKE position. 3. Squeeze the throttle trigger fully and hold through all remaining steps. Starter Handle Choke Lever Primer" Bulb hold the throttle trigger and pull the starter rope 2 more times.
z_ _WARNING: Avoid touching muffler unless engine and muffler are cold. A hot muffler can cause serious burns. _WARNING: Bu_on Air Filter Cover Stop engine and be sure the impeller blades have stopped turning before opening the vacuum inlet door or attempting to insert or remove the vacuum or blower tubes. The rotating blades can cause serious injury. Always disconnect the spark plug before performing maintenance or accessing movable parts.
NOTE: Do not attempt to clean the spark arresting screen. 1. Remove 3 screws from muffler cover. Remove muffler cover. 2. Loosen and remove 4 screws from the muffler hood. Filter i_ Fuel 3. 4. 5. Fuel Line CHECK MUFFLER MOUNTING SCREWS Once each year, ensure muffler mounting screws are secure and tightened properly to prevent damage. 6. Remove the muffler hood and spark arresting screen. Install new spark arresting screen. Reinstall muffler hood and 4 screws. Tighten screws securely.
A WARNING: Perform the following steps after each use: • Allow engine to cool, and secure the unit before storing or transporting. • Store unit and fuel in a well ventilated area where fuel vapors cannot reach sparks or open flames from water heaters, electric motors or switches, furnaces, etc. • Store unit with all guards in place. Position unit so that any sharp object cannot accidentally cause injury. • Store unit and fuel well out of the reach of children.
TROUBLESHOOTING TABLE WARNING: Always stop unit and disconnect spark plug before performing any of the recommended remedies below other than remedies that require operation of the unit. TROUBLE Engh_e will not start. CAUSE REMEDY 1. Engine flooded. 2. Fuel tank empty. 3. Spark plug not firing. 4. Fuel not reaching carburetor. 5. Compression Engine will not idle properly. low. 1. Fuel not reaching carburetor. 2. Carburetor requires adjustment. 3. Crankshaft seals worn. 4.
YOUR WARRANTY RIGHTS AND OBLIGATIONS: The U.S. Environmental Protection Agency/California Air Resources Board and Sears, Roebuck and Co., U.S.A., are pleased to explain the emissions control system warranty on your year 2007 and later small off-road engine. In California, all small off-road engines must be designed, built, and equipped to meet the State's stringent anti-smog standards.
WHERE TO GET WARRANTY SERVICE: Warranty services or repairs shall be provided at all Sears Service Centers. Call 1-800-469-4663. MAINTENANCE, REPLACEMENT AND REPAIR OF EMISSION RELATED PARTS: Any Sears approved replacement part used in the performance of any warranty maintenance or repair on emission related parts will be provided without charge to the owner if the part is under warranty.
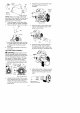
REPAIR PARTS SEARS GAS BLOWER MODEL 358.794740 ./o _kWARNING All repairs, adjustments and maintenance not described in the Operator's Manual must be performed by Qualified Service Personnel Ref. 1. 2. 3. 4. 5. 6. 7. 8. 9. 10. 11. 12. 13. 14. 15. 16. 17. 18. 19. 20. 21. 22. 23. 24. 25. 26. 27. 28. 29. 30. Part No.
REPAIR PARTS SEARS GAS BLOWER MODEL 358.794740 2F ¢ 23 _LWARNING All repairs, adjustments and maintenance not described in the Operator's Manual must be performed by Qualified Service Personnel =. 33 2 Ref. Part No. 1. 2. 3. 4, 5, 6. 7. 8, 9. 10. 11. 545090001 530015241 545081845 530058982 545081832 545115301 530015953 952030249 545084901 545115501 545081855 12. 13. 14. 15. 16. 17. 18. 19. 20. 21.
REPAIR PARTS SEARS GAS BLOWER MODEL I 358.794740 \ I Ref. 1. 2. 3. 4. 5. 6. 7. Description Part No.
Declaraci6n de Garantia Identificaci6n de los Simbolos de Seguridad Reglas de Seguridad Montaje Uso 21 21 22 25 28 Mantenimiento Almacenaje Tabla Diagn6stica Declaraci6n de Emision Lista de Piezas Repuestos y Encargos 31 34 35 36 18 Contratapa DOS ANOS COMPLETO DE GARANTiA PARA CORTADORA DE LiNEA A GASOLINA WEEDWACKER ® DE CRAFTSMAN ® Si este producto falla por un defecto en el material o de mano de obra dentro dos a_hos a partir de la fecha de compra y este se ha utilizado y mantenido de acuerdo al man
AsegOrese de tener el cabello recogido por encima de los hombros. No use joyeria, ropa suelta ni ropa con corbatas, tiras, borlas, etc. que cuelgan libremente. Pueden enredarse en las piezas en movimiento. _0 '-_ SiLJm pret easP _gudee ImaaPnatrea_ i°mY ednlSC° ne cte Ia ,_ADVERTENClA: Detenga el motor antes de abrir la compuerta de entrada de aire del aspirador.
• Soplar recortes de hierba, para u hojas en montones, o para remover escombros de esquinas, alrededor de uniones o entre ladrillos. • Utilice su aparato como aspiradora para: • Recoger material seco como hojas, hierba, ramas peque_as y pedazos peque_ios de papel. • Para obtener mejores resultados al usar la aspiradora, ponga el motor a alta velocidad. • Mu6vase lentamente de un lado a otro sobre el material que de sea aspirar.
daSando el aparato y/u otros objetos, o causando graves heridas a espectadotes o al usuario. • Evite ambientes peligrosos. No use el aparato en lugares sin ventilaci6n ni donde puda haber vapores explosivos o mon6xido de carbono. • No se extienda excesivamente ni use el aparato en superficies inestables tales como escaleras, &rboles, declives acentuadas, techos, etc. Mantenga el equilibrio, con los pies en una superficie estable en todo momento.
AVlSO ESPECIAL: Su aparato viene equipada con silenciador limitador de temperatura y con rejilla antichispa que cumpla los requisitos de los C6digos de California 4442 y 4443. Todas las tierras forestadas federales, m&s los estados de California, Idaho, Maine, Minnesota, Nueva Jersey, Washington y Oreg6n, requieren por ley que muchos motores de combusti6n interna est6n equipados con rejilla CONTENIDO DE LA CAJA Verifique que todos los articulos siguiente lista est6n incluidos: Modelo 358.
6. Para remover los tubos, gire la perilla hacia la izquierda para aflojar el tubos del soplador; remueva el tubos. MONTAJE DE LA BOQUILLA DE ALTA VELOCIDAD Cuando se requiera una velocidad del aire m&s alta, utilice la boquilla de alta velocidad. 1. Alinee las ranuras en la boquilla con las leng0etas en el tubo inferior del soplador. ('_-_ Boquilla de _/z,_ Alta Velocidad Tubo inferiorde1 _ / ,'_" _"_ soplador LengL_eta Ranura 2. Empuje la boquilla sobre el tubo inferior del soplador. 3.
COMO CONVERTIR EL APARATO DE USO DE ASPIRADOR A USO DE SOPLADOR 1. Remueva el tube en forma de codo y la bolsa del aspirador girando la perilla a la izquierda para aflojar el tubo en forma de codo. 2. Remueva los tubos del aspirador girando los tubos a la derecha. 3. Cierre la cubierta de entrada de aire del aspirador y aseg0rese que este cerrada completamente. 4. Vuelva a instalar los tubes de soplador (vea MONTAJE DE LOS TUBOS DE SOPLADOR). Cubierta de Entrada de Aire Entrada de Aire det Aspirador 4.
MONTAJE DE LA BANDA DEL HOMBRO (accesorio opcional #71-85783) 1= Pasando la banda del hombro sobre su cabeza, col6quela en su hombro izquierdo. 2= Cierre el gancho en el retenedor (vea la ilustraci6n siguiente). USO DEL ASPIRADOR SOPLADOR Retenedor Ret_dor _ USO DEL I CONOZCA SU SOPLADOR LEA EL MANUAL DEL USUARIO Y SUS REGLAS DE SEGURIDAD ANTES DE COMENZAR A USAR ESTE APARATO.
SUGERENCIAS UTILES • AI usar el aparato para soplar o para aspirar los escombros, sujete el aparato con el lado del silenciador alejado de su cuerpo y de su ropa (vea POSICION DE USO en la p&gina siguiente). • Se requiere que se use protecci6n de oidos para reducir el riesgo de la perdida de la audici6n asociado con los niveles de sonido. • Detenga el motor antes de instalar o remover accesorios para reducir el riesgo asociado con el contacto de las piezas girantes.
IMPORTANTE La experiencia indic que los combustibles mezclados con alcohol, (los Ilamados gasohol o los que tienen etanol o metanol) pueden atraer humedad, Io que puede causar la separaci6n y la formaci6n de _tcidos durante el almacenaje. La gasolina _tcida puede daSar el sistema de combustible del motor durante el almacenaje. Para evitar problemas con el motor, deber_, vaciarse el sistema de combustible antes de almacenar el aparato por 30 dias o m_,s.
4. 5. 6. 7. Este aparato cuenta con un sistema de arranque Sim-pul-". No tiene que tirar brusca ni en6rgicamente del mango de la cuerda de arranque. Tire del mango de la cuerda de arranque con un movimiento controlado y firme hasta que el motor suene come si est6 intentando arrancar, pero no tire de la cuerda m&s de 6 veces. Tan pronto como el motor suene como si fuera a arrancar, mueva la palanca de cebador a la posici6n HALF CHOKE.
LIMPIE EL FILTRO DE AIRE Los filtros de aire sucios disminuyen el rendimiento del motor e incrementan el consumo de combustible y la producci6n de emisiones nocivas. A 41 ADVERTENClA: Evite hacer contacto con el silenciador a no ser que el motor y el silenciador se encuentre frio. El contacto con un silenciador caliente puede causar quemaduras de gran envergadura.
taje de la tapa/retenedor del tanque. Tire del filtro que se encuentra en el tanque y retirelo de la linea de combustible. Instale un filtro nuevo en la linea de combustible; vuelva a instalar todas las piezas. Filtro del ./ Combustible b Cambie la rejilla antichispa cada 50 horas de la operaci6n o si observe algun da_o o roturas en la rejilla. AVlSO: No intente limpiar la rejilla antichispa. 1. Afloje y retire los 3 tornillos de la cubierta del silenciador. Remueva la cubierta del silenciador. 2.
ADVERTENClA: Realice los si- guientes pasos despu@s de cada uso: • Permita que el motor se enfrie y fije bien el aparato antes de guardarlo o transportarlo. • Guarde el aparato y el combustible en un lugar bien ventilado donde los vapores de combustible no puedan entrar en contacto con chispas o llamas abiertas provenientes de termotanques, motores o interruptores el@ctricos, calefactores centrales, etc.
TABLA DIAGNOSTICA ADVERTENCIA: Siempre apague el aparato y desconecte la bujia antes de hacer cualquiera de las reparaciones recomendadas a continuaci6n que no requieran que la unidad est6 en operaci6n. SlNTOMA CAUSA El motor no 1. El motor esta ahogado. SOLUCION arranoa. 2. El tanque de combustible est& vacio. 3. La bujia no estA haciendo chispe. 4. El combustible no est'. Ilegando al carburador. 5. La compresi6n El motor no anda en marcha lenta como debe. estA beja. 1.
SUS DERECHOS Y OBLIGAClONES DE GARANTIA: La Agencia de Protecci6n Ambiental de los Estados Unidos, la Junta de Recursos Ambientales de California y Sears, Roebuck and Co., U.S.A., se complacen en explicar la garantia con la que cuenta el eistema de control de emisi6n en su motor pequeSo, modelo 2007 y m&s adelante, para uso fuera de carretera.
est6 programada para ser reemplazada como parte del mantenimiento requerido deber& estar garantizada por el periodo de tiempo que comienza en la fecha de compra inicial hasta la fecha del primer reemplazo programado para dicha pieza. DIAGNOSTICO: No se deber& cobrat al dueSo ningOn tipo de cargos pot la labor de diagn6stico la cual determine que una pieza garantizada se encuentra defectuosa si el trabajo de diagn6stico ha sido desempeSado por un Centro de Servicio Sears.
ii!!ii I!iii!_ !iiiii_i !iiiii_i !iiiii_i !iiiil_!i!ii!i!!i!ii!i_iil !ii!i!!iil !iil!!i!i !i!i! _!!iii!_! !iii!_i !iii!_ !iiiii_i !iii!_!i !i!i!!iil !iil!!i!i !i!i! _il!iil!!iil !i!I!_!iiii!_!iiiii_i !iii!_i!iii!_ !i!f! _iil !iil!!iil !i!i!!iil !iil!!i!i !i!i! _il!iii!_! !iii!_i !iii!_ !iiiii_i !iii!_! !i!i!i!!iil !iil!!i!i !i!i! _il!iil!!iil !_!i!!i! !iiiii_!iiiii_i !iiiii_i !iiiii_i !iiiii_i!_!i! _i_ !_ i!i_!_!i i_ _ii!!!i!!!!i!_i!!ii!!_i!!iiii_!!ii!ii_ .........