Owner's Manual CRRFTSMRN ° 32" HIGH PERFORMANCE LAWNSWEEPER Model No. 486.24209 CAUTION: Before using this product, read this manual and follow all Safety Rules and Operating Instructions. Sears, Roebuck and Co., Hoffman Estates, IL 60179 U.S.A. PRINTED IN U.S.A.
Maintenance Schedule ................................................... 12 Storage ........................................................................... 12 Service and Adjustments ................................................ 13 Troubleshooting .............................................................. 13 Repair Parts Illustration .................................................... 14 Repair Parts List .............................................................. 15 Parts Ordering/Service ..
SHOWN FULL SIZE A B C _E NOT SHOWN F FULL SIZE CC :iEF. QTY. A B C D E F G H I J K L M N O 2 2 2 2 2 2 4 1 2 4 2 8 4 4 4 DESCRIPTION REF. QTY. Hex Bolt, 5/16-18 x 3" Lg. Hex Bolt, 5/16-18 x 2-1/4" Lg, Hex Bolt, 5/16-18 x 1-3/4" Lg. Hex Bolt, 1/4-20 x 1-1/4" Lg. Hex Bolt, 5/16-18 x 1" Lg. Hex Bolt, 3/8-16 x 3/4" Lg. Hex Bolt, 5/16-18 x 3/4" Lg. Carriage Bolt, 5/16-18 x 3/4" Lg. Curved Head Bolt, 1/4-20 x 1" Lg. Slotted Screw, #10-32 x 5/8" Lg.
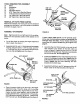
CARTON CONTENTS 11. Windscreen 1. Sweeper Housing Assembly 2. Bag Arm (2) 3. Hitch Tube, L.H. 4. Hitch Bracket (short) 5. Hitch Bracket (tall) 6. Height Adjustment Strap 7. Height Adjustment Handle 8. Hitch Tube, R.H. 9. Rope 10. Hopper Bag 12. 13. 14. 15. 16. 17. 18. 19. Upper Hopper Tube, R.H. Upper Hopper Tube, L.H. Lower Hopper Tube, R.H. Lower Hopper Tube, L.H.
TOOLS REQUIRED FOR ASSEMBLY (t) Pliers Screwdriver Hammer (1) (1) (1) (1) (1) (1) (1) 5/16" X 3" HEX BOLT Adjustable Wrench 9/16" Open End or Box End Wrench 7/16" Open End or Box End Wrench 1/2" Open End or Box End Wrench 3/8" Open End or Box End Wrench REMOVAL OF PARTS FROM CARTON Remove the sweeper, the loose parts and the hardware package from the carton. Lay out the parts and hardware as shown on pages 3 and 4. ASSEMBLY 16" LOCK 5/16" HEX LOCK. NUT OF SWEEPER FIGURE 2 Note: Right hand (R.
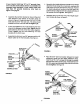
Assemble the height adjustment handle to the height adjustment tube using the curved bolts, washers and nuts which come pre-assembled to the tube. Position the height adjustment handle so that the height adjustment strap is aligned with the outside (left side) of the handle and then tighten. See figure 5. If your tractor hitch has 10" to 13" ground clearance use the Instructions below to assemble the sweeper hitch brackets. It your tractor hitch has less than 10" ground figure 3 on page 5.
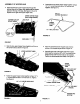
ASSEMBLY OF HOPPER BAG • Insert the left hand upper hopper tube through the stitched flaps of the hopper bag, starting at the center cut out in the top ofthe bag. See figures 7, 8 and 9. Repeat for the right hand upper hopper tube. Assemble the two lower hopper tubes together using a 1/4" x 1"curved head bolt and a 1/4" hex lock nut. "13ghten. See figure 10. 1/4" x 1" CURVED HEAD BOLT UPPER HOPPER TUBE (LEFT HAND SHOWN) CENTER CUT OUT \ BAG FLAP (START HERE) /' TUBE / / ..
Assemble the bag retainer and the bag frame strap to the front edge of the bag bottom. Place the bag retainer on top and the bag frame strap underneath the bag bottom. Fasten together using six #10 x 5/8" slotted screws and #10-32 hex lock nuts. Tighten. See figure 12. FRONT EDGE OF BAG BOTTOM FRAMESTRAP IMPORTANT: Do not over bend the support rods during the following step. Over bending will cause the spring steel rods to loose supporting tension.
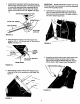
• Slide the hopper bag pivot rod through the side of an upper hopper tube where the hole was pierced. Assemble onto the rod a mounting clamp, two bag arms and another mounting clamp as shown in figure 17. Push the rod on through the other upper hopper tube on the opposite side of the bag. • Secure the rope to the top center of the hopper bag frame as shown in figure 19.
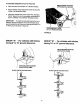
An'ACHING SWEEPER HITCH TO TRACTOR • Race the tractor and sweeper on a fiat level surface. • Set the sweeper height adjustment handle to about the middle of its adjustment range. • Attach the sweeper h_ch to the tractor h_ch, arranging the 3/4" spacers in one of six possible combinations as shown in GROUP A and GROUP B diagrams below. BRUSH HEIGHT ADJUSTED APPROXIMATELY MID-WAY \ IMPORTANT: To obtain the best performance from your sweeper, arrange the spacers so that the sweeper bag is approximate
KNOW YOUR SWEEPER WINDSCREEN HOPPER ROPE PIVOT ROD HEIGHT ADJUSTMENT HANDLE BAG ARM TUBE HITCH BRACKETS HOPPER BAG Hopper Bag Collects grass clippings, leaves and debris. Hopper Rope Permits dumping of hopper bag from driver's seat, Windscreen Helps prevent collected material from being blown out of hopper bag. Bag Arm Tubes Connects the hopper bag to the sweeper housing, Pivot Rod Allows hopper bag to tilt forward to dump material.
CUSTOMER RESPONSIBILITIES • Read and follow the maintenance schedule and the procedures listed in the maintenance section, MAINTENANCE SCHEDULE RII in dates as you completeregular service. ServiceDates (_he(;kfor loose fast_n_r_ Checkfor wornor damagedpads Lubricate brush shaft bearings Lubricate wheel bearings Clean Sweeper CleanJLubricate chain andsprockets SCHEDULED • • • X X X X X X X X MAINTENANCE Clean the sweeper after each use. Inspect for worn or damaged parts, such as brushes and wheels.
BRUSH SPROCKET, REPLACEMENT NOTE: Brush replacement time. • • • • IMPORTANT: should be done one brush at a AND PAWL SERVICE Do not remove both wheels at the same time to avoid mixing of parts. (The R.H. and L.H. ratchet sprockets are not interchangeeble.) Make notes on the position of washers and snap rings during disassembly. Remove the hopper bag from the sweeper. Loosen the hex bolts and lock nuts on two single brush retainers which clamp one brush to the double brush retainers.
REPAIR PARTS FOR MODEL 486.24209 - 32" HIGH 80 91 PERFORMANCE LAWNSWEEPER 49\ / 50 ._55 9O 64 63 \ 64 52 48 2O 24 / 13 / 22 71 23 !o 76 65 66 14 A 7 9 75 72 57 7 34 8 29 D \ 89 67 13 2 67 / 87 /37 63 43 25 4: 38 26 14 32 I 36 44 _ 42 29 40 73 \ B 7
REPAIR PARTS LIST FOR MODEL 486.24209 - 32" HIGH PERFORMANCE REF. NO. PART NO.
For in-home major brand repair service: Call 24 hours a day, 7 days a week 1-800-4-MY-HOME = 0-800-469-4663) Para pedir servicio de reparaci6n a domicilio - 1-800-676-5811 In Canada for all your service and parts needs call - 1-800-665-4455 Au Canada pour tout le service ou les pi_ces For the repair or replacement parts you need: Call 7 am - 7 pm, 7 days a week 1-800-366-PART (1-800-366-7278) Para ordenar plezas con entrega a domicilio - 1-800-659-7084 For the location of a Sears Parts and Repair Cente