612547-329 SEARS OWNERS MANUAL MODEL NO. 315.117130 i:i_i q CAUTION: Read Rules for Safe Operation and Instructions Carefully CRAFTSMAN" 3 INCH BELT SANDER DOUBLE INSULATED SAVE MANUAL FUTURE THIS Introduction FOR Operation Maintenance REFERENCE Repair Parts Designed exclusively for and sold only by SEARS, ROEBUCK AND CO., Dept. 698/731A, Sears Tower, Chicago, IL 60684 612547.
FULL ONE YEAR WARRANTY ON CRAFTSMAN BELT SANDER If this Craftsman Belt Sander falls to give complete satisfactiori within one year from the date of purchase RETURN IT TO THE NEAREST SEARS STORE THROUGHOUT THE UNITED STATES and Sears will repair it, free of charge, If this belt sander is used for commercial or rental purposes this warranty applies for only 90 days from the date of purchase. Tills warranty gives you specific legal rights, and you may also have other rights whic_ vary from state to state.
!• RULES FOR SAFE OPERATION (Continued) 10. WEAR PROPER APPAREL. No loose clothing or jewelry to get caught in moving parts. Rubber gloves and footwear are recommended when working outdoors. Also, wear protective hair covering to contain long hair. 11. USE SAFETY GLASSES with all tools. Also face or dust mask if cutting operation is dusty. 12. DON'T ABUSE CORD. Never carry tool by cord or yank it to disconnect from receptacle. Keep cord from heat, oil, and sharp edges. 13. SECURE WORK.
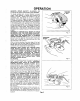
OPERATION J J i Jl- ..... i REAR TRACKING SCREW Make sure power supply is 110-120 volts, 60 HZ, AC only.
OPERATION Selecting the correct size and type sanding belt Is an important step tn achieving a high quality sanded finish. Standard 3 inch x 21 inch sanding belts made of alumi'num oxtde, silicone carbide, and othel' synthettc abrasives are best for power sanding. In general, coarse grit will remove the most material LIFT TENSION RELEASE LEVER TO REMOVE SANDING BELT and fine grit wil! produce the gm0oth_t flni_h in Wl sanding operations.
OPERATION ALWAYS WEAR SAFETY GLASSES OR EYESHIELDS WHEN OPERATING YOUR SANDER. 4 ii!i: To adjust sanding belt, connect Sander to power supply. Place Sander in upside down position as shown in Figure 7. NOTE: This position is for adjustments only. The Sander is not in an operating position. Pull switch trigger and release immediately, Observe tracking of sanding belt. If the sanding belt runs inward, turn the tracking screw clockwise.
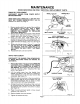
MAINTENANCE WHEN SERVICING USE ONLY IDENTICAL REPLACEMENT PARTS. TIMING BELT REPLACEMENT DISCONNECT SANDER BEFORE SERVICING FROM POWER SUPPLY WHEN REPLACING TIMING BELT, USE REPLACEMENT BELT NUMBER 989368-000 ONLY. See Key Number 5 on Parts List, Page 11. 1. 2. 3. 4. 5. 6. S _EMALL PULLEY Remove sanding belt from sander. See installing and adjusting sanding belt, Page 5. NOTE: REMOVING THE SANDING BELT WILL SIMPLIFY THE PROCESS OF INSTALLING YOUR NEW TIMING BELT.
CORD REPLACEMENT DISCONNECT THE SANDER FROM POWER SUPP. LY WHILE REPLACING PARTS OR MAKING AD. JUSTMENTS. 1. Remove handle cover and screws as described on Page 7. Note the locations of all wiring in the handle and how each connection is made to the cord. Connections and wiring position must be identical when installing the new cord. See Figure 14. 2. Remove the switch from the handle and disconnect the cord leads from the switch. See Figure 15. 3.
THE FOLLOWING RECOMMENDED ACCESSORIES ARE CURRENT AND WERE AVAILABLE AT THE TIME THIS MANUAL WAS PRINTED. CORD LOCK Cat. No. 9 2595 CARRYING CASE Cat. No. 9 14703 CRAFTSMAN CLOTH BACKED SANDING BELTS Cat. No. 9 22304-X-Fine Cat. No, 9 22301-Fine Cat. No. 9 22302.Medium Cat. No, 9 22303-Coarse Cat, No. 9 22305.X.Coarse POLYESTER BACKED SANDING BELTS Cat. No. 9 23201.X-Fine Cat. No. 9 23202.Fine Cat. No. 9 23203-Medium Cat. No.
0 0 c_ Q..
O .......... ° .... .......... .......... .......... • ° ° .... , .... , .... , , • . . , ° , , ......... , • , ° .... • I1 Z "1- ...... 13. '.--_ ' _'_ I-- a , T " _ _ O .... X ('0 'iT ''_ ..... "_"_ ..... ..... , , • ° , , al m -_ E :_ _. ..... : : : : : : • _ O0 • ¢0 '_- _ ..... • • • $ o . w o o ._ .E .E -- 6- .5 OF-O- ,,=, o_._'=..-.o oO m (,9 ._ 0 o ,-0 o _- ... oo,_o'_- (Dt-- coco mOT o l_,,em • o t-- .
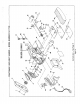
i " CRRFTSMRN SEARS 3 INCH BELT SANDER OWNERS MANUAL DOUBLE INSULATED SERVICE MODEL Now that you have purchased your Belt Sander, should a need ever exist for repair parts or service, simply contact any Sears Service Center and most Sears, Roebuck and Co. stores. Be sure to provide all pertinent facts when you call or visit. NO. 315.