Owner's Manual CRAFTSMAN 7-1/4 in. CIRCULAR SAW Double Insulated future reference. A CAUTION: Read and follow all Safety Rules and Operating Instructions before first use of this product. Customer Help Line; 1-800-932-3188 Sears, Roebuck and Co., Hoffman Estates, IL 60179 USA Visit the Craftsman web page: www.sears.
TABLE OF CONTENTS Table Of Contents.............................................................................................................................................. 2 Warranty........................................................................................................................................................... 2 Introduction.......................................................................................................................................................
RULES FOR SAFE OPERATION The purpose of safety symbols is to attract your attention to possible dangers. The safety symbols, and the explanations with them, deserve your careful attention and understanding. The safety warnings do not by themselves eliminate any danger. The instructions or warnings they give are not substitutes for proper accident prevention measures. SYMBOL MEANING A SAFETY ALERT SYMBOL; A DANGER; Failure to obey a safety warning will result in serious injury to yourself or to others.
RULES FOR SAFE OPERATION (Continued) USE RIGHT TOOL. Don't force small tool or attachment to do the job of a heavy duty tool. Don't use tool for purpose not intended - for example - A circular saw should never be used for cutting tree limbs or logs. WEAR PROPER APPAREL. Do not wear loose clothing or jewelry that can get caught in tool's moving parts and cause personal Injury. Rubber gloves and nonskid footwear are recommended when working outdoors.
RULES FOR SAFE OPERATION (Continued) SUPPORT LARGE PANELS. To minimize the risk of blade pinching and kickback, always support large panels as shown in Figure 9, page 10. When cutting operation requires the resting of the saw on the workpiece, the saw should be rested on the larger portion and the smaller piece cut off. AVOID CUTTING NAILS. Inspect for and remove all nails from lumber before cutting. LOWER BLADE GUARD. NEVER lay a tool down before its moving parts have come to a complete stop.
PRODUCT SPECIFICATIONS Horsepower 2-1/4 Input 12 Amperes 7-1/4 in. {184 mm) Blade Diameter Blade Arbor 5/8 in. {16 mm) Cutting Depth at 0° Bevel Cut Cutting Depth at 45° Bevel Cut 1 -13/16 in. (46 mm) Cutting Depth at 51.5“ Bevei Cut 1-5/8 in. (41 mm) Rating No Load Speed 120voits, 60HZ.AC 5,000 RPM 2-3/8 in. {60 mm) UNPACKING Your circular saw has been shipped compietely assembled except for the blade. Inspect it carefully to make sure no breakage or damage has occurred during shipping.
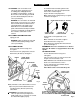
FEATURES KNOW YOUR CIRCULAR SAW See Figure 1. Before attempting to use any too!, familiarize yourself with ail operating features and safety requirements. Features inciude easily operated bevel cut and depth of cut adjustment mechanisms; positive 0° bevel stop; length of cut scale; directed air flow for keeping line of cut clear; and blade wrench storage. SWITCH To turn your saw ON, depress the switch trigger. Release switch trigger to turn your saw OFF.
ADJUSTMENTS Fit saw blade inside lower blade guard and onto spindle. Note: The saw teeth point upward at the front of saw as shown in Figure 2. vA WARNING: Your saw should never be connected to power supply when you are assembling parts, making adjustments, assembling or removing blades, cleaning, or when not in use. Disconnecting your saw will prevent accidental starting that could cause serious personal injury. Replace "D" washer and spring washer.
OPERATION KICKBACK See Figure 6. SAW BLADES The best of saw blades will not cut efficiently if they are not kept clean, sharp, and properly set. Using a dull blade will place a heavy load on your saw and increase the danger of kickback. Keep extra blades on hand, so that sharp blades are always available. Gum and wood pitch hardened on blades will slow your saw down. Use gum and pitch remover, hot water, or kerosene to remove these accumulations. Do not use gasoline.
OPERATION ■ When making a cut use steady, even pressure. Never force cuts. TO LESSEN THE CHANCE OF KICKBACK: ■ Always keep the correct blade depth setting - the correct blade depth setting for all cuts should not exceed 1/4 inch below the material to be cut. See Figure 8. ■ Do not cut warped or wet lumber. ■ Always hold your saw firmly with both hands and keep your body in a balanced position so as to resist the forces of kickback should it occur.
OPERATION STARTING A CUT Know the right way to use your saw. See Figure 11. TO HELP MAINTAIN CONTROL: ■ Always support your workpiece near the cut. ■ Support your workpiece so the cut will be on your right. ■ Clamp your workpiece so it wiil not move during the cut. Place your workpiece with its good side down. Note: The good side is the side on which appearance is important. Before beginning a cut, draw a guideline along the desired line of cut.
OPERATION Hold your saw firmly with both hands. See Figure 14. iV CAUTION: When lifting your saw from the workpiece, the blade is exposed on the underside of your saw untii the lower blade guard closes. Make sure lower guard is closed before setting your saw down on work surface. TO CROSS CUT OR RIP CUT When making a cross cut or rip cut, aiign your line of cut with the outer blade guide notch on the saw base as shown in Figure 15. TOP VIEW OF SAW FRONT OF SAW — BLADE GUIDE NOTCH - Vs RIGHT Fig.
OPERATION TO BEVEL CUT The angle of cut of your saw may be adjusted to any desired setting between zero and 51.5°. Note: When making cuts at 51.5“ blade should be set at full depth of cut, with edge guide screw removed. When making 45° bevel cuts, there is a notch in the saw base to help you line up the blade with the line of cut. See Figure 16. When making a bevel cut hold your saw firmly with both hands as shown in Figure 17, Rest the front edge of the base on the workpiece.
OPERATION POSITIVE 0° BEVEL STOP See Figure 18. TO ADJUST ■ Unplug your saw. ^ WARNING: Failure to unplug your saw could result in accidental starting causing possible serious personal injury. ■ Loosen wing nut. ■ Loosen hex nut securing adjustment screw. ■ Turn screw and adjust base until square with saw blade. ■ Tighten hex nut and wing nut securely. ^ WARNING: Attempting to make cuts without wing nut securely tightened can result in serious injury.
OPERATION TO POCKET CUT See Figure 20. Always adjust bevel setting to zero A WARNING: before making a pocket cut. Attempting a pocket C-clamps, firmly clamp a straight edge to the workpiece and guide the saw along the straight edge to achieve a straight rip cut. Do not bind the blade in the cut. If using the optional rip guide, see the following instructions and Figure 22. cut at any other setting can result in loss of control of your saw possibly causing serious injury.
MAINTENANCE VV WARNING: When servicing, use only identical Craftsman replacement parts. Use of any other part may create a hazard or cause product damage. LUBRICATION All of the bearings in this tool are lubricated with a sufficient amount of high grade lubricant for the life of the unit under normal operating conditions. Therefore, no further lubrication is required. GENERAL EXTENSION CORDS Only the parts shown on parts list, page 19. are intended to be repaired or replaced by the customer.
CRAFTSMAN CIRCULAR SAW - MODEL NUMBER 315.
CRAFTSMAN CIRCULAR SAW - MODEL NUMBER 315.108990 The model number will be found on a plate attached to the motor housing. Always mention the model number in all correspondence regarding your CIRCULAR SAW or when ordering repair parts. SEE BACK PAGE FOR PARTS ORDERING INSTRUCTIONS PARTS LIST Key No. Part Number 1 981579-001 2 Key No. Part Number Data Plate........................................... ........... 1 17 612999-001 Blade Screw..................................................
In U.S.A. or Canada for in-home major brand repair service: Call 24 hours a day, 7 days a week 1-800-4-MY-HOME" (1-800-469-4663) Para pedir servicio de reparación a domicilio - 1-800-676-5811 Au Canada pour tout le service ou les pièces - 1-800-469 4663 For the repair or replacement parts you need: Call 6 a.m. - 11 p.m.