
Owner`s manual


OPERATION (CONTINUED)
Fig. 3
Fig. 4
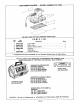
MOTION SELECTIONS
The dual motion feature of your sander provides re-
quired motion for any sanding application. The or-
bital motion provides fast cutting action when you
need to remove old finishes, smooth rough wood,
cut stock down to required dimensions, or sand sur-
faces to be painted. Straight line motion provides
fine finish sanding on work to be stained or varnish-
ed. WARNING: NEVER CHANGE THE MOTION SET.
TING WHILE THE SANDER IS "ON".
SETTING MOTION
1. Unplug the sander. WARNING: FAILURE TO
UNPLUG SANDER COULD RESULT IN AC-
CIDENTAL STARTING CAUSING INJURY.
2. DO NOT CHANGE MOTION SETTING WHILE
SANDER IS OPERATING.
3. For straight line motion slide lever forward as
shown in Fig. 3.
4. For orbital motion slide lever backwards as
shown in Fig, 4.
NOTE: There is a decal on the side of your sander
which indicates correct motion settings.
'/','/ Fig. 5
WARNING: DO NOT WEAR LOOSE CLOTHING OR
JEWELRY WHEN OPERATING SANDER. THEY
COULD GET CAUGHT IN MOVING PARTS CAUSING
INJURY. KEEP HEAD AWAY FROM SANDER AND
SANDING AREA. HAIR COULD BE DRAWN INTO
SANDER AND FOREIGN OBJECTS COULD GET
THROWN AWAY FROM SANDER CAUSING INJURY.
While holding your sander firmly in front of and
clearly away from you, with the sanding surface clear
of any foreign material, slide switch starting sanding
action. Place the sander gently onto the work and
move slowly using forward and backward strokes.
DO NOT FORCE. The weight of the unit supplies
adequate pressure, so let the sanding sheet and
sander do the work. Applying additional pressure on-
ly slows the motor, rapidly wears sandpaper and
greatly reduces speed. Excessive pressure will
overload the motor causing possible damage from
motor overheating and can result in inferior work as
any finish or resin on wood may soften from the fric-
tional heat. Sanding with the grain of wood gives the
smoothest finish while sanding against the grain
results in faster sanding. (See Fig. 5.) The sander can
move the length of the entire surface, however, do
not allow sanding on one spot too long as its rapid
action may remove too much material making the
surface uneven. Always remove sander from
workpiece before sliding switch into "Off" position
stopping sanding action.
Flush sanding can be performed with three of the
four sides of your sander. Every side but the rear of
the sander can be used when sanding in corners.
Always remove sander from workpiece before
sliding into "Off" position stopping sanding action.
Page 5