perator's I:RAFrSMAN° LAWN TRACTOR 17.5 HP 7 Speed, Shift-on=the=Go 42" Deck Model No. 247.28911 • Espanol, P. 59 This product has a low emission engine which operates differently from previously built engines. Before you start the engine, read and understand this Operator's Manual. For answers to your questions this product, Call: Before using this equipment, read this manual and follow 1-800=659=5917 all safety rules and operating instructions.
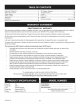
Off-Season Storage ........................................................ 27 Trou bleshooting .............................................................. 28 Labels ............................................................................. 29 Parts List ......................................................................... 30 Espafiol ............................................................................ 59 Service Numbers .............................................
This machinewas builtto be operatedaccordingto the safeoperation practicesin this manual.As with anytype of powerequipment, carelessnessor error on the partof the operatorcan resultin serious injury.This machineis capableof amputatingfingers,hands,toes and feet and throwingdebris.Failureto observethe followingsafety instructionscouldresultin seriousinjuryor death. This symbolpointsout importantsafetyinstructionswhich,if not followed,couldendangerthepersonalsafetyand/orpropertyof yourselfand others.
• SLOPE Slowdownbeforeturning.Operatethe machinesmoothly.Avoid erraticoperationand excessivespeed. Disengageblade(s),set parkingbrake,stopengine and wait until the blade(s)come to a completestop beforeremovinggrass catcher,emptyinggrass,uncloggingchute,removinganygrass or debris,or makinganyadjustments. OPERATION Slopesare a majorfactorrelatedto loss of controland tip-over accidentswhichcan result in severeinjuryor death.All slopes require extra caution.
CHILDREN SERVICE Tragicaccidentscanoccur ifthe operatoris notalert to the presence of children.Childrenare often attractedto the machineand the mowing activity.They do notunderstandthe dangers.Neverassumethat childrenwill remainwhereyou last sawthem. • Keepchildrenout of the mowingareaand inwatchfulcare of a responsibleadultotherthanthe operator. • Be alert and turnmachineoff ifa childentersthe area. SafeHandlingof Gasoline Toavoidpersonalinjuryor propertydamageuse extremecarein handlinggasoline.
General Service • Donot changethe enginegovernorsettingsor over-speedthe engine.The governorcontrolsthe maximumsafe operatingspeed • Never runanengine indoors orina poorly ventilated area.Engine of the engine. exhaust contains carbon monoxide, anodorless, anddeadly gas. Maintainor replacesafetyand instructionlabels,as necessary. • Before cleaning, repairing, orinspecting, make certain the blade(s) andallmoving partshave stopped.
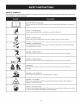
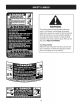
SAFETY SYMBOLS This pagedepictsand describessafety symbolsthat may appearon this product. Read,understand,and follow all instructions on the machine beforeattemptingto assembleand operate. READ THE OPERATOR'S MANUAL(S) Read, understand, and follow all instructions in the manual(s) before attempting to assemble and operate DANGER-- ROTATING BLADES Never carry passengers. Never carry children, even with the blades off.
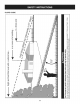
SLOPE GUIDE (.... "'O Or) C;) (=) (== CL) C3, %,==,= (1) c_3 (1) }==== C) _== & 1>-. 03 E c_3 %,==,== C) x o _r }=== (1) _== cL 03 (1) cL o co "_--- (D 03 O Dm m_ I }==,== C) (=3 I v_ i c_3 _2 I I }==== C) I --_ o I ! I l }=.== l m (=) l cz l _r o l }==== l G.) 1> 0_3 0 l c 03 "o l E I I _== Q o _E (3) OO 8 _== I I C:) _= 03 03 _.
ROTATING BLADES CAUSE SERIOUS INJURY OR DEATH DONOTMOWWHENCHILDREN OROTHERS ARE AROUND NEVER CARRY CHILDREN EVEN WITHBLADE(S) OFF. LOOK DOWNANDBEHIND BEFORE ANDWHILE BACKING. MOWING INREVERSE ISNOTRECOMMENDED. WARNING This symbol points out important safety instructions which, if not followed, could endangerthe personal safety and/or property of yourself and others. Read and follow all instructions in this manual before attempting to operate this machine.
IMPORTANT:Yourtractoris shippedwith motoroil in theengine. However,you MUSTcheckthe oil levelbeforeoperating.Referto the Service& Maintenancesectionfor instructionson checkingtheoil level. Attaching the Battery CALIFORNIA Shipping Removal Makesurethe ridingmower'sengineis off, removetheignitionkey, and set the parkingbrakebeforeremovingthe shippingbrace. Refer Ito the Operationsectionfor instructionson howto set the parking lbrake.
f \ 3. Figure3 Placethe steeringwheelcap overthe center of the steering wheeland pushdownwarduntilit "clicks"intoplace. Attaching 3. 4. The Seat If the seatfor yourtractorwas notattachedat thefactory,refertothe followingsteps. NOTE: Forshippingreasons,seatsare eitherfastenedto the tractor seat'spivotbracketwith a plastictie, or mountedbackwardto the pivot bracket.
B A C 14 D G F E J Figure5 A SpeedControl Lever/ ParkingBrakeLever B Throttle/chokecontrol lever C D IgnitionSwitchModule Deck Lift Lever E PTO Lever(Blade Engage) F Cup Holder G Shift Lever H Clutch-BrakePedal NOTE: Any referencein this manualto the RIGHTor LEFTsideof the tractoris observedfromoperator'sseat positionfacingforwardtowardsthe frontof tractor. Meets ANSi Safety Standards CraftsmanTractorsconformto the safetystandardof theAmericanNationalStandardsInstitute(ANSI).
SPEED CONTROL LEVER SHIFT LEVER Thespeedcontrol lever,locatedon the left sideof the tractor'sdashconsole,allowsyouto regulatethe ground speedof the lawntractor.Touse, depressthe clutchbrakepedaland movethe leverout of the parkingbrake notchand forwardto increasethetractor'sgroundspeed. Whena desiredspeedhasbeen reached,releasethe leverintoan appropriatenotchto maintainthat speed. The shift leveris locatedon the left sideof the fenderand hasthree positions,FORWARD,NEUTRAL and REVERSE.
Gas and Oil Fill=up 0il iMPORTANT: Yourtractorisshippedwith motoroil inthe engine. However,you MUSTcheckthe oil levelbeforeoperating.Be careful notto overfill. Forinstructionson howto checkthe engineoil, referto CheckingThe EngineOil in the Serviceand Maintenancesectionof this manual. Gasoline Thegasolinetank is locatedunderthe hood.Do notoverfill. Use extremecarewhenhandlinggasoline.Gasolineis extremely flammableand the vaporsare explosive.Neverfuel machineindoors or whilethe engine is hotor running.
REVERSE CAUTION MODE ENGAGING To engage Use extremecautionwhileoperatingthetractorin the REVERSE CAUTIONMODE.Alwayslookdownand behindbeforeand while backing.Do notoperatethe tractorwhenchildrenor othersare around.Stopthe tractorimmediately if someoneentersthe area. The REVERSECAUTIONMODEpositionof the key switchmodule allowsthe tractorto be operatedin reversewith the blades(PTO) engaged. Start engineas instructed underthe headingStartingThe Engine laterin this section. 2.
STOPPING THE ENGINE 1. 2. 3. Shutengine off and removethe key.Doingso will minimizethe possibilityof havingyour lawn"browned" byhot exhaustfrom yourtractor'srunningengine. If unit stallswith speedcontrolin high speed,or if unitwill not operate with speedcontrol leverin a lowspeedposition,proceedas follows: 1. Placeshift leverin NEUTRAL. If youstrikea foreignobject,stop the engine,disconnectthe spark plug wire(s)and groundagainstthe engine.Thoroughlyinspectthe machinefor anydamage.
HEADLIGHTS A mulchkit canbe purchased,See the ReplacementParts& Attachmentssectionof this manualfor moreinformation. USING THE DECK LIFT LEVER Toraisethe cuttingdeck,movethe deck lift levertothe left,then place it in the notchbest suitedfor yourapplication.Referto SettingThe CuttingHeightearlierin this Operationsection. MOWING Tohelp avoidbladecontactor a thrownobject injury,keepbystanders, helpers,childrenand pets at least 75 feet fromthe machine whileit is in operation.
MAINTENANCE Beforeperforminganytypeof maintenance/service, disengageall controlsand stoptheengine.Waituntilall movingpartshavecometo a completestop.Disconnectsparkplugwireandgrounditagainstthe enginetopreventunintendedstarting.Alwayswearsafetyglassesduring operationor whileperforminganyadjustments or repairs. BeforeEachUse In the FirstFive Hours SCHEDULE Followthe maintenanceschedulegivenbelow.This chart describes serviceguidelinesonly. Usethe ServiceLog columnto keeptrack of completedmaintenancetasks.
ENGINE MAINTENANCE Changing Checking The engineoil shouldbe changedin the first 5 hoursand thenevery 50 hoursor once a season.Tochangethe engineoil, proceedas follows: the Engine Oil Onlyuse high qualitydetergentoil ratedwith APIserviceclassification SF,SG,SH, or SJ, Selectthe oil's SAEviscositygradeaccordingto the expectedoperatingtemperature.Followthe chart below. Althoughmulti-viscosityoils (5W20,10W30,etc.)improvestarting 1. 2.
Fuel Filter Air Cleaner Gasolineand itsvaporsare extremelyflammableand explosive.Fire or explosioncan causesevereburnsor death. • • • • • • • Keepgasolineawayfrom sparks,open flames,pilotlights,heat, and otherignitionsources. Checkfuel lines, tank,cap, and fittingsfrequentlyforcracks or leaks.Replaceif necessary. Beforereplacingthe fuelfilter,drain the fueltank as per the instructions below. Do notdrain fuel whenthe engine ishot. Allowthe engine adequatetime to cool.
Spark Plug Pivot Points 1. Cleanareaaroundthe spark plug base.Do notsandblastspark plug,Sparkplug shouldbe cleanedby scrapingor wire brushing and washingwith a commercialsolvent Lubricateall the pivot pointson the drivesystem,parkingbrakeand lift linkageat leastonce a seasonwith lightoil. Removeand inspectthe spark plug.Checkgap to makesureit is set at .030".See Figure12. The rear wheelsshouldbe removedfrom theaxles oncea season.
CLEANING THE ENGINE AND DECK 2. Anyfuel or oil spilledon the machineshouldbe wipedoff promptly.Do NOTallowdebristo accumulatearoundthe coolingfins of the engine or on anyother partof the machine. IMPORTANT: The useof a pressurewasherto cleanyourtractoris NOT recommended.It maycause damageto electricalcomponents, spindles,pulleys,bearingsor the engine. A screwplug can be foundon yourtractor'sdeck surfaceas seenin Fig. 13.
He× Cap Screw '_. ._ Figure15 5. Seat Adjustment Referto the Assemblysectionof this manualfor seat adjustment instructions. Parking Brake Adjustment Figure16 Lookingat thecuttingdeck from the left side of the tractor,locate the bow-tiepin that securesthedeck support rod on the rear left sideof the deck.See Fig. 17.Removethe bow-tiepin that secures the deck support rod,and carefullyremovethe deck supportfrom the deck lift arm. f / / Neverattemptto adjustthe brakeswhiletheengineis running.
8, Removethe bow-tiecotterpin securingthe deck stabilizerrod to thedeck. Slidethe deck lift rodfrom the mountingbracketon the deck asseen in Fig. 18. The recommended f ........... ,,_i_,_'_ operating tire pressure • Approximately10psi for the rear tires • Approximately14psi for the fronttires is: IMPORTANT: Referto the tire sidewaNfor exacttire manufacturer's recommendedor maximumpsi. Donot overinflate.Uneventire pressurecould causethe cuttingdeckto mowunevenly. _%_L_,;::,/ .....................
If yourtractorhasnot been putinto usefor an extendedperiodof time, chargethe batteryas follows: 1. Setyour batterychargerto delivera max of 10amperes. . 4. If yourbatterychargeris automatic,chargethe batteryuntilthe chargerindicatesthat chargingis complete.If the chargeris not automatic,chargefor no fewerthaneight hours. FUSE Removethe hexflangenut that securesthe bladeto the spindle assembly.See Fig.20.
iMPORTANT: The V-beltfoundon yourtractoris speciallydesigned to engageand disengagesafely.A substitute(non-OEM)V-beltcan be dangerousby notdisengagingcompletely.Fora properworking machine,useidenticalequipmentbeltsas listedin the parts pagesof this Operator'sManual. 11. Whileholdingthe belt and pulleytogether,rotatethe pulleyto the left. Continueholdingand rotatingthe pulleyand belt untilthe belt is fully rolledinto the PTOpulley.
Neverstorelawntractorwith fuel in tank indoorsor in poorly ventilatedareaswherefuel fumesmay reachan open flame,spark, or pilot lightas on a furnace,water heater,clothesdryer,or gas appliance. PREPARING THE ENGINE DRAiNiNG IMPORTANT:Fuelleft in thefuel tank duringwarm weatherdeterioratesand will causeseriousstartingproblems.
Enginefails to start 1. 2. PTO/BladeEngageleverengaged. Parkingbrakenotengaged. 1. 2. Placeleverin disengaged(OFF) position. Engageparkingbrake. 3. 4. 3. 4. Connectwire(s)to sparkplug(s). Placethrottleleverto FASTposition. 5. Sparkplugwire(s) disconnected. Throttlecontrollevernot in correctstarting position. Chokenotactivated 5. Pull theCHOKEcontroloutward. 6. 7. Fueltank empty,or stale fuel. Blockedfuel line. 6. 7. Filltank with clean, fresh(less than30 daysold) gas.
777X41984 777S33583 777122773 777X43688 DONOT USE US50B FUEL STEERIN6 MOUNTING UNDER WHEEL CONTNNiNG HARDWARE CAP, OPERATION STEERING THAN BEFORE _ 18% MQ_E USHANQI _ _ SECURE WHEEL TO SHAFT ACCORDING TOM_HUAL 777D14478 (QTY 2) 777D14507 777123364 (QTY 2) 777D14481 REF: 751 B278826 777122454 (QTY 2) 777D14488 777S30503 777S30018 777123366 29 777122479
Craftsman Lawn Tractor IViodel 247.
Craftsman Ref, No, [ Lawn Tractor Model Part No, 247.28911 Description Ref, No, [ Part No, Description 1 710-04484 Screw, 5/16-18 x .750 25 712-04063 Nut, Hex Flange Ins. Lock, 5/16-18 2 710-04593 Screw, 5/16-18 x .375 26 731-04945 Steering 3 710-0751 Hex Screw, 1/4-20 x .620 27 783-04892B-0637 Dash 4 712-04064 Nut, Hex Flange Insert Lock, 1/4-20 28 746-04364 Throttle/Choke 5 725-0157 Cable Tie, 3/16 x .05 x 7.
Craftsman Lawn Tractor Model 247.
Craftsman Ref, No, 1 [ Lawn Tractor Model 247.28911 Part No. Description 683-04155A-0637 Ref, No, I Part No, Description Shaft, Lift 24 756-04196A 747-04857 Belt Keeper Rod Assembly Engagement Pulley 2 712-04065 Nut, Hex Flange Insert Lock, 3/8-16 25 3 714-04040 Bow-Tie Pin, 91, RH 26 710-04484 Screw, Hd. Tapp, 5/16-18 x .75 4 716-0106A E-ring, .
Craftsman Lawn Tractor IViodel 247.
Craftsman Ref, No, 1 2 [ Lawn Tractor Model Part No. 617-04024 710-0376 247.28911 Description Ref, I No, I I Part No, Description 23 938-04007A-0637 Axle Assmbly LH Screw, 5/16-18, 1.00, Gr5 24 638-04008P Axle Assmbly RH 683-0128B-0637 Pivot Bar Axle Assembly Gear Assembly, Steering 3 710-0643 Screw, 5/16-18, 1.00, Gr5, Lock 25 4 710-1309 Screw, Mach, 5/16-18, 0.750 26 710-04484 Screw, 5/16-18, 0.750 5 710-3180 Screw, 5/16-18, 1.
Craftsman Lawn Tractor Model 247.
Craftsman Lawn Tractor Model Ref, No, 247.28911 [ Part No. Description 1 710-04483 Screw, 1/4-20 x .500 2 710-04484 Screw, 5/16-18 x .750 3 710-0599 Screw Pan Torx Head, 1/4-20 x .500 4 731-04591A Cup Holder 5 736-0607 Lock Washer, 5/16 6 783-0458704043 Fender 7 783-04843-0637 Lift Adjuster 8 783-148900637 Seat Mounting 9 712-04063 Flangelock 10 720-04061 Knob, 3/8-16 x .875 II 732-1184 Extension 12 936-0108 Flat Washer, .510 x .750 x .
Craftsman Lawn Tractor / IViodel 247.
Craftsman Lawn Tractor Model 247.28911 I Ref, I Description Part No. 1 683-04549 Muffler 2 710-0227 Screw, AB #8-18 0.500 3 710-04683 Tap Screw, 3/8-16 1.000 4 710-0642 Tap Screw, 1/4-20 0.750 5 710-1314A Screw, Socket 6 712-0271 Sems Nut, 1/4-20 7 721-0208 Exhaust 8 725-0157 Cable Tie, 3/16 X .05 X 7.4 9 726-0205 Hose Clamp, .490 Dia. 10 728-04000 Pop Rivet, .188 Dia X .
Craftsman Lawn Tractor IViodel 247.
Craftsman Ref, No, ] Lawn Tractor Model Part No, 247.28911 Description Ref, NO, [ Part No, Description 33 747-05188 Brake Rod Pedal Assembly 34 747-05243 Shift Rod, 46" Shaft 35 948-0334 Spacer, T-Axle 750-0566A Spacer, .260 x .375 x 1.030 LG 1 918-04566 Transmission 2 647-0403400637 Drive Assembly 3 647-04035 4 710-0227 Screw, 8-18:0.500 36 5 710-04484 Screw, 5/16-18 x .750 37 750-0802 Spacer, .640 ID x .76 OD x 2.63 6 710-0599 Screw, 1/4-20 x 0.
Craftsman Lawn Tractor IViodel 247.
Craftsman Ref, No, [ Lawn Tractor Model Part No, 1 918-04822A 2 683-0254B-0637 3 956-1227 4 983-04511 247.28911 Description Ref, No, I Part No, Description Spindle Pulley Assembly 29 736-0262 Flat Washer, .385 x .870 x .092 Deck Hanger Bracket Assembly 30 736-0362 Flat Washer, .330 x 1.25 x .06 Spindle Pulley 31 738-04146 Bolt Plug, M16 x 1.5 Brake Assembly 32 738-04162A Shoulder 738-04166 Shoulder Spacer, .8840 x .
Craftsman Engine IViodel 31C707=1346=G2 48 SHORT BLOCK 1036 EMiSSiONS For IViodel 247.28911 LABEL 1058 OPERATOR'S MANUAL 1329 REPLACEMENT 85O 684 584 q _ 11 _ ...... _/_,_ 585_ 1264 306 741 616 _f 1270 _f 505 [i 759 358 ENGINE GASKET SET 15÷ 12 943 _"" 20:,_ 51 {_'_,, ..... \,% 524 0 691 _:/// 842 <-_ 868 _'_' 1022 22 1266 ,!_ 200 617 ¢.
Craftsman Engine IViodel 31C707-1346-G2 For IViodel 247.
Craftsman Engine IViodel 31C707=1346=G2 ' 130_'_") 95_ 987 For IViodel 247.28911 I _ 633 (_ I 217_ (_:_ 1091 51 o 127 276 % _-?_ 121 CARBURETOR OVERHAUL KiT 127 (_ 51 617 LJ 1266 I 987 (_ 633 _ 217.
Craftsman Engine 1036 EMiSSiONS IViodel 310707-1346-G2 For IViodel 247.28911 LABEL 1040 i 1267 _ 968 z, i 305 305A 643 967 73i _,, 415A =_ i ,,',1 _, _¢_,_. X '_i i_ ",:,,]J 1005 _ X ,, !_v i / %-'% 1044 78 _!, _ 23 1051 783 47 <_' ,i:I!3,1_ S _:_ _'_ ....
Craftsman Engine IViodel 31C707-1346-G2 For IViodel 247.28911 1119 3o9i 334 _ 1051 _" 1054 801 544 783 310 803 513 729 i¸ 462 _i 579 _2 797 'L._9 802 £L:_.
Craftsman Ref, No, I 1 Engine Model 31C707-1346-G2 Part No. 796010 For Model Ref, Description Cylinder 247.
Craftsman Ref, No, Engine Model 31C707-1346=G2 Part No. For Model Description 247.28911 Ref, No, [ Part No.
Craftsman Engine Model 31C707-1346-G2 Ref, I No, I 1034 I For Model 247.28911 Description Part No.
This page intentionally left blank. Use this page to make any notes regarding 52 your tractor.
This page intentionally left blank. Use this page to make any notes regarding 53 your tractor.
Look For Relevant Emissions Durability Period and Air index information On Your Engine Emissions Label Engines that are certified to meet the California Air Resources Board (CARB) Tier 2 Emission Standards must display information regarding the Emissions Durability Period and the Air Index. Sears Brands Management Corporation makes this information available to the consumer on our emission labels.
(Thispage applicablein the U.S.A.and Canadaonly.) Sears Brands Management Corporation (Sears), the California Air Resources Board (CARD) and the United States Environmental Protection Agency (U.S.
FEDERAL and/or CALIFORNIA EMISSION CONTROL WARRANTY STATEMENT YOUR WARRANTY RIGHTS AND OBLIGATIONS MTDConsumerGroupInc,the United StatesEnvironmentalProtectionAgency (EPA),and, forthose productscertifiedfor sale in the stateof California,the CaliforniaAir ResourcesBoard(CARB)are pleasedto explainthe emission(evaporativeand/or exhaust)controlsystem(ECS) warrantyon youroutdoor 2006 andlater smalloff-roadspark-ignitedengine andequipment(outdoorequipmentengine)In California,new outdoorequipmentengines must
WARRANTED PARTS: The repairor replacementof any warrantedpart otherwiseeligiblefor warrantycoveragemay be excludedfrom such warrantycoverageif MTDConsumerGroup Inc demonstratesthatthe outdoor equipmentengine has beenabused,neglected,or improperlymaintained,and thatsuch abuse, neglect,or impropermaintenancewasthe direct causeof the needfor repairor replacementof the part.
Congratulationson makinga smartpurchase.YournewCraftsman@ productis designedand manufacturedfor yearsof dependableoperation. But likeall products,it may requirerepairfrom time to time.That's whenhavinga RepairProtectionAgreementcansave youmoneyand aggravation.
Operaci6n segura Practicas .......... Etiquetas De Seguridad ................ Asamblea ........................... Operacion de ...................... De Servicio y Mantenimiento de ....... Paginas Page Page Paginas Paginas 58 58 65 67 74 Fuera de temporada de almacenamiento .. Page 83 Solucion de problemas ................ Page 84 Lista de piezas ..................... Paginas 30 Reparaci6n de Acuerdo de Proteccion .... Page 89 Servicio de nOmeros ............
Esta rn_.quinarueconstruidapara seroperadade acuerdocon las reglasde seguridadcontenidasen este manual.AI igualque concualquiertipo de equipo rnotorizado,un descuidoo error por partedel operadorpuedeproducirlesionesgraves.Estarn_.quina es capazde arnputarrnanosy piesy de arrojarobjetoscon gran fuerza.De no respetarlas instruccionesde seguridadsiguientesse puedenproducirlesionesgraveso la rnuerte.
• • • • • • • • Nuncadeje la rn_.quina en funcionarnientosinvigilancia.Apague siernprelascuchillas,coloqueel frenode rnano,detengael motory retirela Ilaveantesde bajarsedel vehiculo. Tengasurnocuidadoal cargaro descargarla rn_.quina en un rernolqueo carni6n.Estaunidadno debeconducirseen ascensoo descensode rarnpas,porquepodrialadearsey provocarlesiones personalesgraves.En las rarnpasla rn_.quina se debeernpujar rnanualrnente paracargarlao descargarlacorrectarnente.
• Paraevitaraccidentesal operaren rnarchaatr_.s,siernpredesenganchelascuchillasantesde colocarrnarchaatr_.s.Si est,.instalado, el "ModoPrecauci6nMarchaAtr_.s"(hojasde operarla rn_.quina, rnientrasque lospaseosa la inversa)no debeutilizarsecuandohay ni_osu otraspersonaspresentes. • Mantengaa losni_osalejadosde losrnotoresen rnarchao calientes. Puedensufrirquernaduras conun silenciadorcaliente. • Retirela Ilavecuandodejela rn_.quina sinvigilancia,evitequeuna personasinautorizaci6nla rnaneje.
• NO MODIFIQUE Reviselos pernosde rnontajede la(s)cuchilla(s)y del motor a intervalosfrecuentespara verificarque est_n bienapretados. Adern_.s,inspeccionevisualrnentela(s) cuchilla(s)en buscade da_os(por ejernplo,desgasteexcesivo,abolladuras,rajaduras, etc.). Reernplacela(s) cuchilla(s)Onicarnenteconlas cuchillas de fabricantesde equiposoriginales(O.E.M.)listadasen este manual.
S[IVIBOLOS DE SEGURIDAD Esta p&ginarepresentay describela seguridadlos simbolosque puedenpareceren este producto.Lea,comprenda,y sigatodas instrucciones en la m_quinaantesprocurarpara reuniry operar. i LEA EL MANUAL(S) DEL OPERADOR leido, entienda, y siga todas las instrucciones en el manual(s) antes de procurar montar y funcionar i PELIGRO-- DE EL CORTE DE PIE Nunca transporte pasajeros. Nunca transporte nihos, aun con la cuchilla apagada.
GUiA DE PENDIENTE c).
ROTATING BLADES CAUSE SERIOUS INJURY OR DEATH DONOTMOWWHENCHILDREN OROTHERS ARE AROUND NEVER CARRY CHILDREN EVEN WITHBLADE(S) OFF. LOOK DOWNANDBEHIND BEFORE ANDWHILE BACKING. MOWING INREVERSE ISNOTRECOMMENDED. ADVERTENCIA Este simbolo seRalaa cabo las instrucciones de seguridad importantesque, si no se siguen, podria poner en peligro la seguridad personal y / o la propiedad de si mismo y los dem,_s.Lea y siga las instrucciones en este manual antes de intentar operar esta m_tquina.
IMPORTANTE: Su tractorse entregaconaceite de motoren el motor.Sin embargo,debe cornprobarel nivelde aceiteantes de operar.Consultela secci6nde ServMoy Mantenirnientopara obtener instrucciones sobrela cornprobaci6ndel nivelde aceite. CONEXION DE LOS CABLES PROPOSlCION el Servicioy Mantenirnientode la secci6nde este manualantesde operarel tractor.
QUE UNE EL VOLANTE Si el volantede su tractorno Ileg6adjunta,el hardwarede la colocaci6nse ha embaladoen el volante,por debajode la tapadel volante.Concuidadola tapa de la palancadel volantey quitarel hardware. 1. Conlas ruedasdel tractor,apuntandodirectamentehaciadelante, colocarel volantesobreel eje de direcci6n. 2. Coloquela arandela(con la parteahuecadahaciaabajo) sobreel volantey seguracon el tornillohexagonal.Wase la figura.3.
B A C D F E Figure5 NOTA:Cualquierreferenciahechaen este manualal lado DERECHO o IZQUlERDOdel tractordebe entendersetal como se observa desdela posici6ndel operador. Cumple con los est_ndares de seguridad de ANSI Lasm_.quinasquitanievede Craftsmancumplenconlosest_.ndares de seguridaddel institutoestadounidense de est_.ndares nacionales(ANSI).
DE VELOCIDAD Paradetenerel motor,girar la Ilavede encendidoen sentidocontrario a la posici6nSTOR La palancade controlde velocidad,ubicadoen el lado izquierdodel tablerodel tractorde la consola,le perrnite regularla velocidadbajadel tractordel c_sped.Para usarlo,presioneel pedalde freno-ernbraguey mover la palancade la rnuescade frenode estacionarnientoy haciadelantepara aurnentarla velocidaden tierra del tractor.
CARGA DE ACEITE Y GASOLINA combustiblede trinquete,STOPIlenarel tanquede combustibleuna vez que se ve el interiorde la bocade Ilenado.Estoaseguraque un buenvolumende expansi6nse creaIo contrario,el desbordamiento de combustiblepuedecrearuna situaci6npeligrosa.NO rematarel tanquede combustible.En losmodelosde California,Ileneel tanque de conformidadconla Figura6. Aceite IMPORTANTE:Su tractorse enviacon aceiteen el motor.Sin embargo,usted DEBEcontrolarel nivelde aceiteantesde hacerlo funcionar.
SISTEMA DE BLOQUEO DE SEGURIDAD El sisternade bloqueode seguridadest&dise_adopara la operaci6n seguradel tractor.Si este sisternanuncadeja de funcionarcorrectarnente,no opere el tractor,contacteinrnediatarnentecon su Sears Parts & RepairServiceCenter. • El sisternade bloqueode seguridadirnpideel arranquedel vehiculoa rnenosque el frenode estacionarnientoy se dedica a la tornade fuerza (Blade Engage)palancaest,. en la posici6n OFFdesconectadoposici6nO. 3. 4. 5.
ARRANQUE DEL MOTOR LA CONDUCCION No hagafuncionarel tractor,si el sistemade bloqueono funciona correctamente.Estesistemarue diseSadopara su seguridady protecci6n. Evitecomienzapronto,el excesode velocidady paradasbruscas. NOTA: Refi_rasea la gasolinay el aceite hastacompletarlas instruccionesanteriormenteen esta secci6n. 1. Insertela Ilavedel tractoren el interruptorde encendido. 2. Colocarla toma de fuerza (Blade Engage)palancaen la posici6n OFFdesconectadoposici6n0.
INVOLUCRAR A LOS BLADES 1. 2. La palancade carnbiosen puntornuerto. Reinicieel motor. 3. Coloquela palancade control de velocidaden la posici6nrn_.s altavelocidad. Participaci6nde la tornade fuerza(BladeEngage)lastransferenciasde energiaa la plataforrnade corteo de otto tipo(disponiblepot separado) los archivosadjuntos.Paraparticiparde las hojas,haga Iosiguiente: 4. Ernbrague-pedaldefrenocornpletarnente. 1. 5. 6. Pisarel ernbrague-pedalde freno.
CORTAR FAROS Paraayudara evJtarel contactocon la cuchJllao una lesJ6nen el objetolanzado,Mantengaa losespectadores,losayudantes, los niSosy las rnascotaspor Io rnenos75 piesde distanciade la rn_.quinarnientrasest,. en funcionarniento.Paradade la rn_.quina,si alguienentraen el _.rea. La siguienteinforrnaci6nser_.Qtilcuandose utilizala plataforrnade corte con sutractor: Plande su patr6nde corte para evitarla descargade rnateriales hacialas carreteras,aceras,transeQntes, etc.Adern_.
PROGRAMA DE iVlANTENIIVllENTO Siga el prograrnade rnantenirnientoa continuaci6n.Estegr_.fico describelas directricesde serviciosolarnente.Utilicela colurnna Antesde realizar cualquier tipodernantenirniento / servicio, desconectar todos loscontroles ypararel motor.Espere hastaquetodaslaspiezasrn6viles ban Ilegado a unaparadacornpleta. Desconecte elcablede labujfaytierracontra elmotorparaevitarelarranquenodeseado.
iVlANTENIIVllENTODEL MOTOR Comprobar el aceite del motor $61oel uso de aceite de alta detergenteseevalu6la calidadcon la clasificaci6nde servicioAPI SF,SG,SH, o SJ. Seleccioneel aceitede gradode viscosidadSAEde acuerdocon Cambio de la ternperaturade funcionarniento.Siga la tabla de abajo. Aunquevarios de los aceitesde viscosidad(5W20,10W30,etc) rnejorarla partida utilizadopor encirnade 32 o R Reviseel nivelde aceite del motorcon rn_.
* Laspiezas derecarnbio debe serlarnisrna einstalados enla rnisrna posiciSn quelaspiezas originales. Sisederrarna combustible, espere hasta queseevapora antes dearrancar elmotor. Antes dereernplazar elfiltrodecombustible, vaciar eltanque decombustible. DeIocontrario, elcombustible puede filtrarse y provocar unincendio ounaexplosi6n. * * Paradrenar el combustible: 1.
Silenciador • IMPORTANTE: Sial quitarla bateriapor cualquierraz6n,desconecte el cablenegativo(Negro)es el cablede la terminalen primerlugar, seguidopor el positivo(rojo) de alambre.Cuandovuelvaa instalarla bateria,conecteel positivo(rojo)de alambrede suterminalen primer lugar,seguidopor el negativo(cableNegro).Aseg0resede que los cablesest_n conectadosa los terminalescorrectos,inversi6nde ellos podriacambiarla polaridady provocarda_osal sistemade alternancia de su motor.
Untornillode cierrese puedeencontraren la superficiede la cubierta de sutractorcornoseve en la figura. 12.Este complernentose puede reernplazarcon un puertode aguaspara serutilizadocornopartede un sisternadisponiblepor separadola cubiertade lavado. El sisternade lirnpiezade cubierta,se utilizar_,paraenjuagarlos recortesde c_spedde la parteinferiorde la cubiertay evitar la acurnulaci6nde sustanciasquirnicascorrosivas.
AJUSTE DEL ASIENTO Consultela Configuraci6nde la Asarnbleayen la secci6nde este manualpara instruccionesde ajustedel asiento. FRENO DE ESTACIONAMIENTO Evitelas lesionespellizcos.Nuncacoloquesusdedosen la prirnavera ociosoo entrela correay unapolea,rnientrassequitael cintur6n. DE AJUSTE NOTA: El arcode pelo alfilerde corbataclips debe ser instalado desdearriba haciaabajo. 5. Nuncaintente ajustarlosfrenoscuandoelmotorest&funcionando.
EL ARRANQUE Retirecon cuidadoel cablede tornade fuerza de la partetrasera de la plataforrnade corte al elirninarel clip de horquillaque Io sujeta.Retireel rnuelledel soporte ruedaIocade la cubierta, V_asela figura. 18. . Nuncasalteiniciaruna bateriadaSadao congelados.Est_ segurode losvehiculosno se tocan,y est_.nfuerade ignici6n.No perrnitaque lasabrazaderasde cableal tacto. 1. 2. 3. 4. Conectarpositivo(+)para enviarpor cablepositivo(+)de la bateriadescargadade su tractor.
CUCHILLAS DE CORTE Apagueel motory quitela Ilavede encendidoantesde retirarla cuchillade corte (s) paraafilaro de sustituci6n.Protejasus rnanos usandoguantesgruesosal sujetarla hoja. Inspeccioneperi6dicarnentela hojay / o husillode grietaso da_os, sobretododespu_sde haberIlegadoa un objetoextra_o.Nohaga funcionarla rn_.quina hastaquese sustituir_.n loselernentosda_ados. Paraquitarlas hojas, hagaIo siguiente. 1. 2. 3.
5. 6. Paracolocar la correanueva,empiezahaciendoque el cintur6n alrededorde lasdos poleasexteriordel huso,como se muestra en la figura.21. Luego,la cinta de rutaalrededorde lasdos polinespoleasde la cubiertacomose muestraen la figura.21. 7. 8. Volvera apretarla barraposeedordel cintur6naflojadoantes. Volvera montarla cinta de losguardiasde retirarseantes. 9. Vuelvaa instalarla cubierta,asegur_.ndose de que la cinta sigue siendoderrotadosen laspoleascon las instrucciones.
Nuncaalmacenetractorde cespedconcombustibleen el tanque en un espaciocerradoo en _.reasconpoca venfilaci6n,donde los gases del combustiblepuedanalcanzarel fuego,chispaso una luz pilotocomo la que tienenalgunoshornos,calentadoresde agua, secadoresde ropao algQnotto disposifivoa gas. PREPARACI6N DEL MOTOR EL DRENAJE 1. IMPORTANTE:El combustibleque quedaen el tanquecuandohace calorse deterioray ocasionagravesproblemasde encendido.
El motorno arranca 1. 2. Perillade potenciade arranque(PTO)conectada. 1. Noest&colocado elfreno de mano. 2. Se ha desconectadoel cable de lasbuj[as. 3. Coloque la perillaen la posici6nde desconexi6n(OFF). Coloque elfreno de mano. Conecte elcable a las buj[as. La palancade controldel reguladorno est_ en la posici6nde arranquecorrecta. Nose ha activadoel cebador 4. Muevala palancadel reguladora la posici6nFAST (r@ido). Tire elcontrol del CEBADORhacia afuera.
Busque el periodo de duraci6n de emisiones importantes yla informaci6n la etiqueta de emisiones de su motor de clasificaci6n de aire en Los motores cuyo cumpiimiento con los estAndares de emisi6n Tier 2 de la Comisi6n de Recursos Ambientales de California (CARB) est6 certificado deben exhibir la informaci6n relacionada con el periodo de duraci6n de ias emisiones y la clasificaci6n de aire.
(Esta p_.ginase aplica s61oen EE.UU. y Canada.).
DECLARACION FEDERAL y/oDECALIFORNIA SOBRE SUS DERECHOS Y OBLIGACIONES GARANTJAS EN EL CONTROL DE EIVIISIONES EN CUANTO A LA GARANTJA MTDConsumerGroupInc, laAgencia de Protecci6nMedioambientalde los EstadosUnidos(EPA),y para aquellosproductoscertificadosparasu ventaen el estadode California,el Departamentode los Recursosdel Aire de California(CARB)secomplacenen explicarla garanfiaque cubre al sistemade control (ECS)de emisiones(evaporativasy/o de escape)de su equipoy motor(motor de equipos de exteriores)de
8. Durante latotalidad delperiodo degarantia delmotor yequipo para todo terreno arriba mencionado, MTD Consumer Group Incmantendr_ unsuministro depiezas bajo garantia suficiente para satisfacer lademanda esperada detales piezas. 9. Cualquier pieza dereemplazo sepodr_ usar para elcumplimiento delmantenimiento olasreparaciones bajo garantia ysesuministrar_n sincargo para elpropietario. Dicho usonoreducir_ lasobligaciones degarantia deMTD Consumer Group Inc. 10.
Felicitacionespor haberrealizadouna adquisici6ninteligente.El productoCraftsman@que ha adquiridoest_ dise_adoy fabricado para brindarrnuchosa_osde funcionarnientoconfiable.Perocorno todoslos productosa vecespuederequerirde reparaciones.Esen esernornentocuandoel disponerde un Acuerdode protecci6npara reparacionesle puedeahorrardineroy problernas.
Riding Equipment questions or problems? Satisfaction with your purchase is our number one concern! To troubleshoot problems, get answers to questions, order parts, or schedule repair service for your Riding Equipment, call the number below. Para respuestas a preguntas o problemas, y ordenar piezas o pedir servicio para la reparacibn de su equipo, Ilame el nt_mero abajo. 1-800-659-5917 Craftsman Help Line www.craftsman.