Save This Manual for Future Reference SEARS owner's manual MODEL NO. 113.177060 Serial ',lumber Model and serial numbers may be found on the side of the powerhead, You should record both model and serial numbers in a safe place for future use. FOR YOUR SAFETY READ ALL INSTRUCTIONS CAREFULLY I:RRFTSMRN 16 GALLON WET/DRY VAC WITH DETACHABLE BLOWER • assembly • operating • repair parts Sears, Roebuck and Co., Hoffman Estates, IL. 60179 U.S.A. Part No. SP6069 Printed in U.S.A.
FULL ONE YEAR WARRANTY ON CRAFTSMAN WET/DRY VACS If within one year from the date of purchase, this Craftsman Wet/Dry Vac tails due to a defect in material or workmanship, Sears will repair it, free of charge. If this Craftsman Wet/Dry Vac is used for commercial or rental purposes, this warranty coverage applies for only 90 days from date of purchase. Warranty Service Is Available By Simply Contacting The Nearest Sears Service Centerldepartment Throughout The United States.
Toavoidinjuryfromaccidental starting, unplug power cordbefore changing or cleaning filter. Donotunplug bypulling oncord.To unplug, grasp theplug,notthecord. Donotusewithdamaged cord,plugor otherparts.IfyourWet/Dry Vacisnot working asitshould, hasmissing parts, hasbeendropped, damaged, left outdoors, or dropped into water, return it to a Sears Service Center. Do not pull or carry by cord, use cord as handle, close a door on cord, or pull cord around sharp edges or corners. Do not run Wet/Dry Vac over cord.
Introduction This Wet/Dry Vac is intended for household use only. IMPORTANT NOTE Please Read Carefully Static Shocks Are Common - In dry areas or when the relativehumidityof the air is low. To reduce the frequency of static shocks in your home the best remedy is to add moistureto the air with a console humidilier. Table of Contents item Page Warranty Information ............................. 2 Safety Instructions ................................. 2 Introduction.........................................
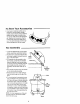
Float/Cage Assembly Detachable WARNING: For your own safety, never connect plug to power source outlet until all assembly steps are complete and you have read and understood the safety and operation instructions. Do not operate vac with any parts damaged or missing. 1. Remove the detachable blower from the power head assembly by unlatching the power head latch under the carry handle of the detachable blower. Set the detachable blower off to the side. 2. Unlatch the drum latch holding the lid to tile drum.
Filter Assembly 1. Carefully slide the filter over the tilter cage, sliding it over the center ring covering the 3 slots until the tilter stops against the lid. 2. Place the hole in the filter plate over threaded screw of the fgter cage. 3, Gently push on the filter plate to seat the rubber ring of the filter inside the circular channel of the tilter plate. 4. Place filter nut onto threaded screw and tighten it down. Finger tighten only.
4.Position thedovetail portion ofoneof thewheelassemblies intotheaccessorycaddy asillustrated. Tapthewheel support intotheaccessory caddy witha softmallet. Repeat forthesecond wheelassembly. 5.Turntheaccessory caddy upright. Thiscompletes theassembly ofyour16 gallon weVdry vacaccessory caddy. Thecaddyisnowready toinstallthesixteengallon drumofyourCraftsman wet/ dryvac. To Install Your Vac Drum Onto the Caddy Drum 1.
To Store Your Accessories 1. Your Sears Craftsman wet/dry vac is designed to provide better stability, mobility and accessory storage with the addition of the caddy. Located at the rear of the caddy are five storage pockets. Wet/dry vac accessories may be conveniently stored here while not in use. The center storage pocket is specifically designed for the wet nozzle. Vac Assembly 1. Locate the lid/float/cage and the drum/ caddy assemblies (assembled earlier). 2.
Positioning Detachable Blower (Power Head Assembly) 1, Locate the Detachable blower o! your Sears Craftsman vac. The top of the detachable blower has two hinges. To assemble the detachable blower to the lid assembly, the two hinges need to rest in the two hinge recesses in the lid assembly above the Inlet port of the vac. 2, Tilt the detachable blower up 45 ° and nest the hinges into the hinge recesses in the lid assembly. 3. Rotate the detachable blower down Hinge 45 ° \ until the downward travel stops.
Operation WARNING To avoid fire or explosion, do not operate this vac in areas with flammable gases or flammable vapors such as lighter fluid, cleaners, oil*base paints, gasoline, alcohol or explosive dust such as coal, magnesium, grain or gun powder in the air. Do not vacuum explosive dust, flammable or combustible liquids or hot ashes. Do not use this vac as a sprayer for any flammable or combustible liquid. To avoid health hazards from vapors or dusts, do not vacuum toxic materials.
Emptying Dust Drum WARNING: To avoid injury from accidental starting, unplug power cord before emptying the drum. I. To remove the lid to empty contents of the dust drum, simply liftthe drum latch holding the lid to the drum/caddy assembly and lift the lid assembly up and off the drum. NOTE: Do not pick up the lid assembly by lifting on the handle to the detachable blower. Lift the lid assembly by the Lid.
Operation (continued) Blowing Feature Your wet/dry vac features a "detachable blower". It has the capability to be used as a dedicated blower for yard work, patio cleanup and workshop applications to blow sawdust and other debris. WARNING: Always wear safety goggles complying with ANSI Z87.1 when us ng as a blower. t Mask Blowing Port WARNING: To avoid injury to bystanders, keep them clear of blowing debris. Extension Wand 1.
To clean the foam pad under the intake IMPORTANT: To avoid damage to the blower wheel and motor, always reinstall shield of the detachable blower: the filter before using the va¢ for dry t. Remove the three screws holding the matedat pickup, intake shield. 2. Lift the intake shield off and set aside. CAUTION: Do not remove the filter cage or float. It is there to shut off air3. Lift the foam pad off and clean in warm flow when the drum s full of liquids. soapy water or brush debris away.
farthest from you,) Wet Nozzle To pick up liquids off a smooth surface, use the 2-1/2" wet nozzle accessory supplied with your wet/dry vac. To use this nozzle, simply attach the nozzle to the end of an extension wand. Connect a second extension wand to the first, and connect the 2-1/2" x 7' hose to the extension wand. Liquids may be picked up by dragging the nozzle across the sudace. The squeegee will dry the surface as you vacuum.
No tes 15
Repair Parts 16 Gallon Wet/Dry Vac With Detachable Model Number Blower 113.177060 Always order by Part Number - Not by Key Number WARNING SERVICING OF DOUBLE-INSULATED WET/DRY VAC In a double-insulated Wet/Dry Vac, two systems of insulation are provided instead of grounding. No grounding means is provided on a double-insulated appliance, nor should a means for grounding be added.
Repair Parts 16 17
£RRFTSMRN® Accessories and Attachments Get more versatility from your Craftsman wet/dry vacuum by adding these accessories. Additional wet/dry vac accessories may be purchased at your local Sears retail store or Sears/Craftsman Power and Hand Tool Catalog.
16934 Hose Grip 16917 Hose Joiner 16930 Hose Lock 16936 Gutter Sawdust Collection Series Whole-shop Sawdust Manifold-Type Collection System 29964 Radial Arm Saw Dust Collection Kit 29963 Table Saw Dust Collection Kit 29962 19 Nozzle
For the repair or replacement parts you need Call 7 am - 7 prn, 7 days a week 1-800-366-PART (1 8go 366 7278) For in-h0me majorbrand repair service Call 24 hours a day, 7 days a week 1-800-4-REPAIR (1-800-473-7247) For the location of a SearsRepair Service Centerin your area Call 24 hours a day, 7 days a week 1-800-488-1222 For information on purchasinga Sears Maintenance Agreementor to inquire about an existing Agreement Call 9 am - 5 prn, Monday-Saturday 1-800-827-6655 SEARS America's Re oat( $pe