f Save This Manual For Future Reference SEARS owner's manual MODEL NO. 113.177825 Serial Number Model and serial numbers may be found on the handle. You should record both model and serial numbers in a safe place for future use. FOR YOUR SAFETY CRRFTSMRN® 12 GALLON FULL BLOWING WET/DRY VAC • assembly • operating • repair parts READ ALL INSTRUCTIONS CAREFULLY Sears, Roebuck and Co., Hoffman Estates, IL. 60179 U.S.A. Part No.
FULL ONE YEAR WARRANTY ON CRAFTSMAN WET/DRY VACS If within one year from the date of purchase, this Craftsman Wet/Dry Vac fails due to a defect in material or workmanship, Sears will repair it, free of charge. If this Craftsman Wet/Dry Vac is used for commercial or rental purposes, this warranty coverage applies for only 90 days from date of purchase. WARRANTY SERVICE IS AVAILABLE BY SIMPLY CONTACTING THE NEAREST SEARS SERVICE CENTER/DEPARTMENT THROUGHOUT THE UNITED STATES.
Toavoidinjuryfromaccidental starting, unplug powercordbefore changing or cleaning filter. Donotunplug bypullingoncord.To unplug, grasptheplug,notthecord. Donotusewithdamaged cord,plugor otherparts.If yourWet/Dry Vacisnot working asitshould, hasmissing parts, hasbeendropped, damaged, leftoutdoors, ordropped intowater,returnittoa SearsService Center. Donotpullorcarrybycord,usecordas handle, closeadooroncord,orpullcord around sharpedges orcorners. Donot runWet/Dry Vacovercord.Keepcord away fromheated surfaces.
Introduction This Wet/Dry Vac is intended for household use only. IMPORTANT Please Read NOTE Carefully Static Shocks Are Common - In dry areas or when the relative humidity of the air is low. To reduce the frequency of static shocks in your home the best remedy is to add moisture to the air with a console humidifier. Owner's Key A B C D E F G H J K L M N O P Description ........................... Qty. Vac Assembly ............................. 1 Hose Assembly ...........................
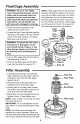
Float/Cage Assembly WARNING: For your own safety, never connect plug to power source outlet until all assembly steps are complete and you have read and understood the safety and operation instructions. Do not operate vac with any parts damaged or missing. • Place the power assembly of vac upside down into the drum• 2. Locate the float• Place the float over the opening in the center of the lid with the words "This Side Towards Lid" laying face down over the hole.
Caster/Caster Foot Assembly 1. Remove the power assembly from the dust drum and set aside. 7. Turn the drum upright. 2. Turn the dust drum upside down on the floor. 3. Insert the caster feet into the bottom of drum, as shown (4 places). 4. Push on the caster foot until the foot is flush with bottom of the dust drum. C as'e r ___. 5. Insert the caster stem into the socket of the caster foot, as shown (4 places). 6.
6.Insertthesoftendofthehose,whichis opposite theswivelend,intothevacuumportdirectly abovethedrain. 7.Placetheutilitynozzle securely onthe swivel endofthehoseandthevacis ready foruse. Cord Wrap_. Area '" NOTE: The swivel end of the hose is removable if more hoses need to be attached for more length from the vac. To remove the swivel portion of the hose, grasp the hose swivel and firmly pull it out of the flexible hose.
Operation WARNING To reduce the risk of fire or explosion, do not operate this vac in areas with flammable gases, vapors or explosive dust in the air. Flammable gases or vapors include but are not limited to; lighter fluid, solvent type cleaners, oilbase paints, gasoline, alcohol or aerosol sprays. Explosive dusts include but are not limited to; coal, magnesium, grain or gun powder. Do not vacuum explosive dust, flammable or combustible liquids or hot ashes. Do not use this vac as a sprayer.
Emptying the Drum WARNING: To reduce the risk of injury from accidental starting, unplug power cord before emptying the drum. • The vac for easy unscrew site side comes equipped with a drain emptying of liquids. Simply the drain cap and lift the opposlightly to empty the drum. 2. Another option is to remove the power assembly• Pull the flexible latches outward on each side of the lid to release from the drum. 3. While holding the latches out, lift the power assembly up and away from the drum. 4.
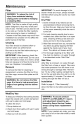
Maintenance Filter IMPORTANT: To avoid damage to the blower wheel and motor, always reinstall the filter before using the vac for dry material pickup. WARNING: To reduce the risk of injury from accidental starting, unplug power cord before changing or cleaning filter. Dry Filter 1. Some removal of dry debris can be accomplished without removing the fitter from the vac. Slap your hand on top of the power assembly while the vac is turned off.
Wet Nozzle farthest from you.) To pick up liquids off a smooth surface, use the 2-1/2" wet nozzle accessory supplied with your wet/dry vac. To use this nozzle, simply attach the nozzle to the end of an extension wand. Connect a second extension wand to the first, and connect the 2-1/2" x 7' hose to the extension wand. Liquids may be picked up by dragging the nozzle across the surface. The squeegee will dry the surface as you vacuum.
Repair Parts 12 Gallon Wet/Dry Vac Model Number 113.177825 Always order by Part Number - Not by Key Number WARNING SERVICING OF DOUBLE-INSULATED WET/DRY VAC In a double-insulated Wet/Dry Vac, two systems of insulation are provided instead of grounding. No grounding means is provided on a double-insulated appliance, nor should a means for grounding be added. Servicing a doubleinsulated Wet/Dry Vac requires extreme care and knowledge of the system, and should be done only by qualified service personnel.
Repair Parts 12 Gallon Wet/Dry Vac Model Number 113.
CRRFTSMRN® Accessories and Attachments Get more versatility from your Craftsman wet/dry vacuum by adding these accessories. Additional wet/dry vac accessories may be purchased at your local Sears retail store or Sears/Craftsman Power and Hand Tool Catalog.
HoseLock 16935 GutterNozzle 16934 HoseGrip 16917HoseJoiner 16930 Sawdust Collection Radial Arm Saw Dust Collection Kit 29963 Series Table Saw Dust Collection Kit 29962 15
For the repair or replacement parts you need Gall 7 am - 7 pro, 7 days a week 1-800-366-PART (1-800-366-7278) For in-home major brand repair service Call 24 hours a day, 7 days a week 1-800-4-REPAIR (1-800-473-7247) Forthe location of a Sears Repair Service Center in yourarea Call 24 hours a day, 7 days a week 1-800-488-1222 For information on purchasinga Sears Maintenance Agreement or to inquire about an existing Agreement Call 9 am - 5 pro, Monday-Saturday 1-800-827-6655 SEARS g;t=;/', r/;l..