
User's Manual


Page 7
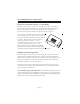
Belt clip installation
M-175 SNAP-ON BELT CLIP (Included)
Belt clip removal
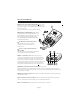
c. Turn on the transmitter with program from the audio source being fed to
the transmitter. Observe the audio “voice” level modulation indicator. A full
bright LED indicates full audio compression at 100% modulation. For best
performance, the audio input gain should be adjusted for some low level
LED luminescence during normal audio levels with occasional full bright
peaks indicating 100% modulation.
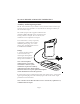
d. When using the auxiliary audio input with the microphone plugged into
the transmitter, priority should be given to the microphone gain adjustment.
The mixing balance between the auxiliary audio and the microphone should
be made with the volume control of the auxiliary audio source.
Note: The optional microphone switch only affects the
microphone. It does not affect the auxiliary audio input.
M-169 AUX OPERATION (Cont.) / SNAP-ON BELT CLIP
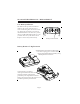
STEP 1:
Hook belt clip
retaining lip over
front case ridge.
STEP 2:
Rotate belt clip down onto case. Apply
pressure on both sides of clip, snapping
clip retainers into slots.
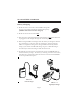
Clip retainer
Retainer slot Belt clip removal indent
Flex out and pull down with your
thumb or a large coin (quarter) to
unsnap belt clip from case.