E Data Editor for PX-5S User’s Guide Use this manual in combination with the User’s Guide that comes with the Instrument.
Contents Introduction............................................................................ 4 What is Data Editor?........................................................................................................... 4 MIDI Data Communication Function Precautions............................................................ 4 Minimum Computer Operating Environment ................................................................... 5 Use of This Software .............................................
Phrase Convert Mode.......................................................... 19 What you can do in this mode... ...................................................................................... 19 Important! .......................................................................................................................... 19 Screen Content ................................................................................................................. 19 Phrase Convert Mode Operations .........
Introduction What is Data Editor? Data Editor is application software that lets you perform the following operations on your computer. z Manipulate Instrument* parameters from your computer. z Open and edit data files created on the Instrument or on your computer. z Save Instrument user data on your computer. z Transfer user data files from your computer to the Instrument. z Convert SMF format files to phrase data files. * PX-5S (Referred to as “the Instrument” in this manual.
Minimum Computer Operating Environment ■ Supported Operating Systems Windows® XP (SP2 or higher) *1 Windows Vista® *2 Windows® 7 *3 Windows® 8 *4 Mac OS® X (10.5.X, 10.6.X, 10.7.X, 10.8.
Getting Ready, Starting Up, Shutting Down Getting Ready Windows Users 1. Download the Data Editor software file from the CASIO website to your computer. 2. Uncompress the file. This will create a folder named “CASIO DataEditor for PX-5S” on your computer. Mac Users 1. Download the Data Editor software file from the CASIO website to your computer. 2. Open the file. This will create an image named “CASIO DataEditor for PX-5S”. Copy the image to the application folder.
Exiting Data Editor Click the close (×) button in the title bar of the Data Editor window. • A confirmation dialog box will appear if you try to exit Data Editor while it is transferring data or performing some other process. Click the [Yes] button to terminate the process and exit Data Editor. Screen Content • The screen shot below is from a computer running Windows XP. (1) Title bar “” is displayed in the title bar when there is no connection between the computer and Instrument.
Parameter Edit Mode What you can do in this mode... • Manipulate Instrument parameters from your computer. • Open and edit data files created on the Instrument or with Data Editor on your computer. • Save edited contents as a file that is supported by the Instrument. Important! • This mode uses the MIDI data communication function and bulk dump data transfer function. See “MIDI Data Communication Function Precautions” on page 4. • Some parameters cannot be changed using Data Editor.
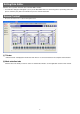
Screen Content • The screen shot below is from a computer running Windows XP. • Data selector dialog box (Stage Setting Edit) (1) Category tabs Clicking a tab switches to the applicable category. (2) Data selector button Selects Instrument preset data and user data numbers. (3) Data name box Shows the name of the data. To change the data name, input a new name here. (4) Undo button Undoes the last operation. (5) Redo button Redoes the last undone operation.
(8) Save user data button Saves data as Instrument user data. (9) Reset button Returns data to its pre-edited state. (10) Reload button Click to reflect the Instrument status in the software. ■ Using the Tabs • Clicking a tab displays the applicable editing items. • Right-clicking a tab displays a menu. Selecting “Detach” on the menu displays the tab contents in a new window. • Closing the window returns it to the tabs. ■ Using the Controllers Dials • Rotating a dial changes its setting.
Sync Button (Absolute Mode, OFF) / (Absolute Mode, ON) (Relative Mode, OFF) / (Relative Mode, ON) • Click to toggle syncing between enabled and disabled. • Right-clicking the button displays a menu. • Selecting “Sync All On” on the menu enables all syncing. • Selecting “Sync All Off” on the menu disables all syncing. • Selecting “Absolute Mode” on the menu enters the absolute sync mode. • Selecting “Relative Mode” on the menu enters the relative sync mode.
Stage Setups • This mode can be used to open stage setup data (.ZPF) files. • Edited data can be saved as a stage setup data file. • For information about editable parameters, see “To edit a stage setup” in the Instrument’s User’s Guide (Tutorial). • Zone parameters can be synced. Tone • Displayed tabs and controllers depend on the tone selected with “(2) Data selector button”. • For details, see the explanations for each tone below.
System Setting • For information about editable parameters, see the following items in the Instrument’s User’s Guide.
■ Naming Data This operation cannot be used with the “Mixer” or “System Setting” screen. 1. Input the desired name into “(3) Data name box” and then press the [Enter] key. • The name you assign is used by the Instrument as the data name. • The characters shown below can be used in a data name. Any character that is not included in the table below will automatically be replaced with an underscore (_). ■ Saving Edits to a File This operation cannot be used with the “Mixer” or “System Setting” screen. 1.
Transfer Mode What you can do in this mode... • Save user data you created on the Instrument to your computer. • Transfer user data files from your computer to the Instrument. • Delete user data in Instrument memory. • Delete user data files stored on your computer. Important! • This mode uses the MIDI data communication function and bulk dump data transfer function. See “MIDI Data Communication Function Precautions” on page 4.
(4) Memory usage bar Shows the current memory usage status of the Instrument’s memory. This bar is displayed when “Phrase” is selected by the “(1) Data type selection box”. Maximum allowable memory usage is 100%. (5) Computer file list Lists data stored in the computer data folder (page 30). (6) Instrument data list Lists user data stored in Instrument memory. (7) All process progress bar Shows how many processes have been completed out of the total number of processes being performed.
Using the Transfer Tab Transferring Data from the Instrument to a Computer 1. Use the “(1) Data type selection box” to select the type of data you want to transfer. 2. In the “(6) Instrument data list”, find the data you want to transfer. 3. Drag the data you want to transfer from the “(6) Instrument data list” and drop it into the “(5) Computer file list”. The files you drag and drop are placed in a queue, and transferred one-by-one.
Deleting Instrument User Data 1. Use the “(1) Data type selection box” to select the type of data you want to delete. 2. In the “(6) Instrument data list”, find the data you want to delete. 3. Drag the data you want to delete from the “(6) Instrument data list” and drop it into “(3) Trash”. The files you drag and drop are placed in a queue, and deleted one-by-one. The deleted data is removed from the “(6) Instrument data list” as each process is completed. Deleting User Data from a Computer 1.
Phrase Convert Mode What you can do in this mode... • Convert SMF format 0 or 1 MIDI files to phrase data and save the data. Important! • Even if a particular MIDI file is SMF format 0 or 1, it may not be able to be converted properly due to other reasons. • To transfer a converted phrase data file to the Instrument, use the Transfer Mode. Screen Content • The screen shot below is from a computer running Windows XP. • The bottom of the screen appears as shown below while conversion is in progress.
(6) Conversion start point selection box Specifies the start point for conversion to a phrase data file. (7) Conversion start measure specification box Specifies the phrase data file conversion start measure. This item appears only when “Selected Measure” is selected for “(6) Conversion start point selection box”. (8) Conversion end point selection box Specifies the phrase data file conversion end point. (9) Conversion end measure specification box Specifies the phrase data file conversion end point.
Phrase Convert Mode Operations To convert a MIDI file to a phrase data file 1. In the “(3) MIDI file list” find the MIDI file you want to convert. 2. Drag the file from the “(3) MIDI file list” to the “(4) Phrase data file list”. The files you drag and drop are queued, and conversion processes are performed in sequence. Each time a process is complete, the converted file will appear in the “(4) Phrase data file list”.
■ To specify events to be omitted from a conversion 1. In the “Passing Events” list on the left of the “(10) Event filter setting panel”, select an event you want to omit. 2. Click the double right arrow (>>) button in the middle of the “(10) Event filter setting panel”. This will move the selected event from the “Passing Events” list to the “Blocking Events” list of events to be omitted. ■ To specify events to be included in a conversion 1.
Package Edit Mode What you can do in this mode... Create and edit package files that group multiple user files into a single file. Important! • Your computer does not need to be connected to the Instrument to use the functions in the Package Edit Mode. • To transfer a package file to the Instrument, use the Package Transfer Mode. • Package files are native to Data Editor and cannot be used directly by an Instrument.
(1) Data type selection box Selects the target data type for the mode you are in. The files that appear on the “(8) Computer file list” and “(10) Package content file list” change in accordance with the data type you select here. The available data types depend on the connected Instrument model. For details, see the page 34. (2) New package file button Creates a new package file. (3) Open package file button Opens an existing package file and displays its contents.
Using the Package Edit Tab Basic Operation The following is the basic flow for package file editing. 1. Create a new package file. To create new package file immediately after starting up Data Editor, click the Package Edit tab. This will immediately enable package file editing. To discard the package file you are currently editing and create a new one, click the “(2) New package file button”. • If the package file you are editing has not been saved yet, a confirmation dialog box will appear.
Other Operations ■ Deleting a File Registered to a Package File Drag the data you want to delete from the “(10) Package content file list” and drop it into “(6) Trash”. ■ Re-editing an Existing Package File Click the “(3) Open package file button”. This will display a dialog box for selecting a package file to edit. Select the package file you want to edit. • If the package file you are editing has not been saved yet, a confirmation dialog box will appear.
Package Transfer Mode What you can do in this mode... Transfer package data created with the Package Edit Mode to an Instrument. Important! • This mode uses the MIDI data communication function and bulk dump data transfer function. See “MIDI Data Communication Function Precautions” on page 4. Screen Content Package Transfer Tab • The screen shot below is from a computer running Windows XP. The bottom of the screen appears as shown below while transfer is in progress.
(5) Send package file button Select a package file in the “(3) Computer file list” and then click this button to transfer the files inside the package file to the Instrument. (6) All process progress bar Shows how many files have been transferred out of the total number of files registered in the package file. This progress bar is displayed only while a transfer process is being performed. (7) Individual process progress bar Shows the progress of the current transfer process.
Deleting a Package File from a Computer 1. In the “(3) Computer file list”, find the file you want to delete. 2. Drag the file from the “(3) Computer file list” and drop it into “(2) Trash”. This performs the same operation as that performed on your operating system when you discard something with trash. Renaming a Package File on Your Computer 1. In the “(3) Computer file list”, select the file you want to rename and then double-click it. 2. This will change to the file name editing mode.
Preference Mode What you can do in this mode... • Configure MIDI device settings. • Configure folder settings. Screen Content • The screen shot below is from a computer running Windows XP. (1) Auto Search Selecting this check box enables auto Instrument search and connect. (2) MIDI device reload button Reloads the MIDI device. (3) MIDI IN device Specifies the MIDI IN device. (4) MIDI OUT device Specifies the MIDI OUT device.
Configuring Settings ■ MIDI Settings • Select the “(1) Auto Search” check box when using a USB connection between the Instrument and computer. This will cause the computer to automatically search for and connect to the Instrument. • When using a MIDI connection between the Instrument and computer, clear the “(1) Auto Search” check box and configure “(3) MIDI IN device” and “(4) MIDI OUT device” settings manually. ■ To adjust the MIDI OUT interval 1.
TIPS Shortcut Key List Description Shortcut Button Undo Ctrl + Z Redo Ctrl + Y Open File Ctrl + O Save File Ctrl + S Save User Data Ctrl + W Reset Ctrl + R Reload Ctrl + E Data Selector Ctrl + D • On a Macintosh, press the Command key in place of Ctrl above. Using the Mouse’s Right Button to Scroll In each mode, display areas may have scroll bars as shown below.
Using a USB Flash Drive to Transfer Data between the Instrument and a Computer User data files that have been saved to a USB flash drive on the Instrument can be copied to the data file folder (page 30). This will make the files available to Data Editor. Also, user data files that have been saved from the Instrument to a computer using Data Editor can be copied to a USB flash drive. Then the USB flash drive can be inserted into the Instrument’s USB port.
User Data Reference Icon File name extension Data Type Stage Setting .ZPF Stage Setup Melody Tone .ZTN Melody Tones Hex Layer Tone .ZLT Hex Layer Tone Drum Tone .ZDR Drum Sounds Arpeggio .ZAR Arpeggios Phrase .ZPH Phrase Song Sequencer .ZSQ Song Sequencer Remarks – – – – – The overall memory capacity of the Phrase area is limited, so certain Instrument conditions can make transfer impossible.
Error Messages Operation errors, Instrument status problems, Data Editor operating environment problems, and other factors can cause error messages to appear during operation. Look up the error message in the list below and perform the required action as noted. Message Cause Required Action Already Running A different instance of Data Editor is already running. Use the already running instance of Data Editor.
Message File Format Error Memory Full Cause Required Action The format of the file is not supported by Data Editor. The file is not supported by Data Editor. Use a different file. The file is corrupted. The file is unusable. If the same data is still available on the Instrument, re-save the data and use it. User data memory is full. • If the message appears in the Package Edit Mode: No more phrase data files can be transferred to the Instrument.
MA1304-A DATAEDITORPX5-E1A