
Installation Manual


Carl’s Place LLC | carlofet.com | info@carlofet.com
Step-By-Step Instructions to Build Your Own Projector Screen (wall-mount):
Attaching ProGray or ProWhite Projector Screen Material directly onto drywall should be done
using the same technique as when attaching our other materials into a frame.
NEVER fold, bend or crimp ProGray/ProWhite as this will cause permanent damage.
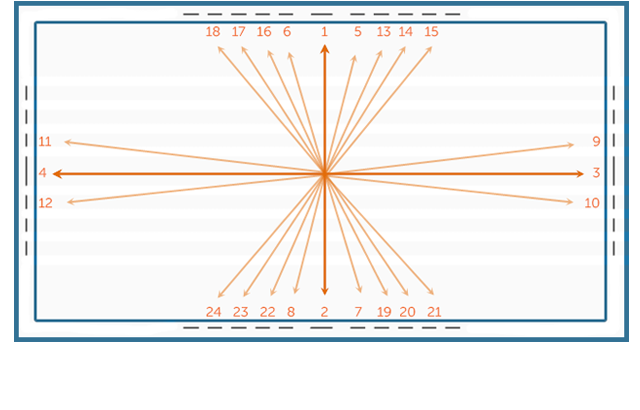
1. Using heavy duty staples, start on the top and place several staples in the center (1). Move
to the bottom and place several staples in the center (2), pulling the fabric straight across.
(View Labeled Image)
2. Move to the right side and place several staples in the center (3), pulling the fabric out from
the center. Move to the left and place several staples in the center (4), pulling the fabric
straight across.
3. At the top add a couple staples, about 2-3 inches to each side of the original staples (5 & 6).
Make sure to pull with even tension out from the middle. Repeat at the bottom (7 & 8),
right (9 & 10) and left (11 & 12) sides.
4. Add 3 staples, again 2-3 inches apart, at the top of the frame (13-15 & 16-18). Repeat at the
bottom (19-21 & 22-24), right and left sides. Again make sure to pull with even tension out
from the middle as shown in the diagram.
5. Continue adding 2-4 staples, evenly spaced and rotating to opposite sides until the screen
is completely secured all the way around the material. Do not staple in a circle around
the material, always rotate to the opposite side with even tension, to avoid waves
and ripples.
ProGray and ProWhite will also work for a roll down application. Unfortunately, we do not
currently carry roll down mechanisms, motorized rollers, kits or instructions to build a roll
down screen. If you decide to make a roll down screen you will need to be confident you can
design this yourself.